
Russian Tea Cakes… those dense little snowy bundles of sweet confectionary sugar, butter, flour, and nuts is a classic Christmas cookie that has been a staple in our holiday baking since I was a little kid. One of the most simple of cookies to make, it has other aliases as well…Mexican Wedding Cakes, Rolling in the Snow, Holy Rollers and the plain Jane, practical name… Pecan Balls.
The history behind these guys is muddy but a popular theory is that they originated in Europe as a tea time snack (hence their name Russian Tea Cakes) and migrated to Mexico with European nuns where they became a popular cookie served at weddings (Mexican Wedding Cakes!). A friend who grew up in Canada knew them as Rolling in the Snow cookies (how very fun!) and at a church-sponsored flea market in the South, I once saw them advertised as Holy Rollers on the food and beverage table. That could have been someone’s clever name made up just for that day, so I’m not sure if this one has actual traction, but it does pay homage to the nun theory anyway. And of course, for all the literal lovers out there, the Pecan Ball needs no explanation as to how that name came about since indeed these cookies are ball-shaped and can contain pecans.
Traditionally they look something like this…

and can contain any nuts you like – pecans, walnuts, peanuts, pistachios, macademia, etc. My mom always used walnuts and favored the recipe from the Betty Crocker Picture Cook Book printed in 1950…

so that became my family tradition as an adult too. Some other recipes include additional ingredients of cinnamon or loose tea, lavender or lemon zest but Betty Crocker’s version is the one we like best.
Russian Tea Cakes
1 cup soft butter
1/2 cup sifted confectioner’s sugar (plus additional following baking)
1 tsp. vanilla
2 1/4 cups sifted flour (Betty recommended Gold Medal flour back in the day)
1/4 tsp. salt
3/4 cup finely chopped nuts
Mix butter, sugar and vanilla together in a medium-sized mixing bowl. Sift flour and salt together and mix into butter. Stir in nuts and then cover the bowl with plastic wrap and chill in the fridge for about 20-30 minutes. Preheat oven to 400 degrees. Remove dough from fridge and roll into 1″ inch balls* using your hands. Place 2.5 inches apart on an ungreased baking sheet and bake until set but not brown (between 10-12 minutes).** While still warm roll in confectioner’s sugar. Cool and then roll in sugar once again.

* To make snowmen: You will need to form three balls per snowman ranging in size from big (base) medium (middle) small (head). Roll each ball in your hand to shape it into a typical snowball shape and then flatten the big and medium balls on the top and bottom with your hand so that that they will sit on top of each other without rolling off. The smallest ball (the head) should only be flattened on the bottom (so that your snowman will have a round head on top). The snowmen pictured here are three inches in height, so use your judgment when shaping as far as ball sizing. If you want to make bigger snowmen, baking times will need to be extended.
** If you are making snowmen – Bake all the big bottom base snowballs together on one sheet and then the medium and small balls on another sheet since the smaller balls usually take 1-2 minutes less baking time then the big balls. Your snowball sizes will look something like this…

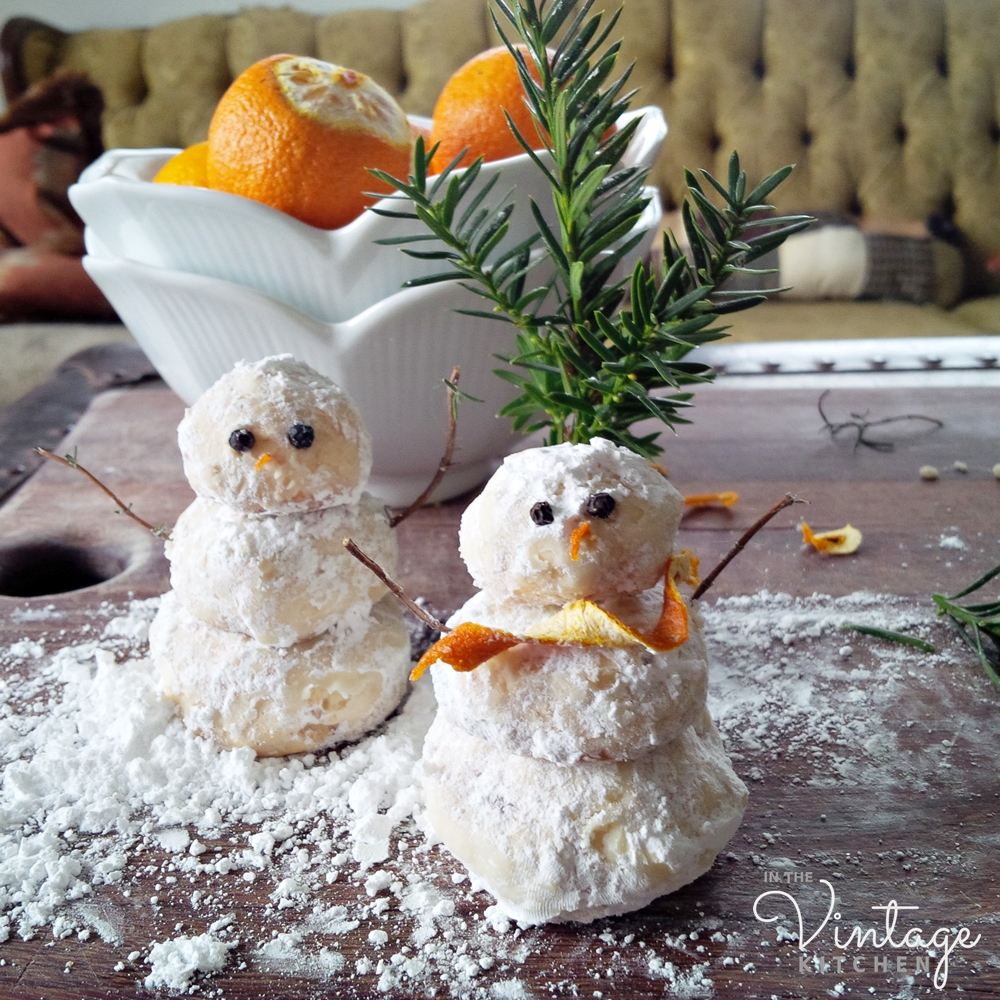
After you’ve baked and sugared all your cookies, now you are ready for the fun part of decorating. This is what I had on hand in the “props” department…

Orange rinds for the scarf and nose, black peppercorns for the eyes and rosemary branches for the arms. To make the scarf and nose just take a vegetable peeler and peel about 3 inches of rind in one long continues piece. Trim with a sharp paring knife to your desired scarf thickness and curl the rind around your fingers to shape it like a scarf (once the rind dries out it will hold the shape perfectly). Wedge the scarf into the section where the head meets the body.

Press the peppercorns into the head gently. They will stick on their own (this step might take a couple of attempts!).
Cut a thin long triangle out of your excess orange rind (to mimic the shape of a carrot) and gently press into the head where the nose should be. The orange rind will stick to the cookie on its own but might take a couple of attempts too.
Cut rosemary branches to size and poke into each side of the middle ball.

And now your snowman has come to life! Just like the ones you make in your yard, each one will have his own little personality depending on how you style it. The sky is the limit when it comes to decorating your guy so feel free to get creative if you want to make a hat, a jacket or a corncob pipe. Additional mounds of powdered sugar help set the stage for a little wintertime scene, day or night…

Hope this project adds a little fun to your day! Cheers to a winter wonderland from the sweetest little snowmen in the Vintage Kitchen!


My favorite of all Christmas cookie! Make a double batch – they go fast. And they freeze really well. I used to make them with walnuts but now I use the toasted (not salted) pecan pieces from Trader Joes.
LikeLiked by 5 people
Great suggestion on doubling the batch and freezing them! These guys just adore the cold air:) Thanks for sharing the pecan idea. We’ll try those in our next batch.
LikeLiked by 3 people
My family has been making these amazing cookies since the 50’s. We always use black walnuts. They’re hard to find, but so very good.
LikeLiked by 5 people
Oh fun Elizabeth! Black walnuts sound delish! Do they taste much different a common walnut?
LikeLiked by 2 people
This is a wonderful post. A family member brought over a few of these in a goodie bag and they were absolutely delightful.
LikeLiked by 3 people
Oh how fun! They are definitely our most favorite cookies to make for the holidays. We usually make giant batches because they freeze well too. Hope you get to make your own batch soon!
LikeLiked by 2 people
Pure genius! Great shots too.
LikeLiked by 5 people
Thank you so much! It’s absolutely lovely to see you in the vintage kitchen!
LikeLiked by 1 person
How gorgeous is your blog presentation? Can I please just move in?! Yet to read all your recipes but am definitely going to enjoy watching and copying and learning history along the way. Bravo; thrilled to have found you!
LikeLiked by 5 people
Thank you so much for your kind words. I’m so glad to have found you too! Look for a new post coming out this week (fingers crossed for tomorrow!)
LikeLiked by 3 people
oooh, how exciting!
LikeLiked by 4 people
These are adorable!
LikeLiked by 6 people
Thank you so much! It’s a fun little winter activity – especially if you live in a state that doesn’t get much snow:)
LikeLiked by 2 people
Here goes nothing…… Off to my kitchen. Black walnuts are kinda new to me.
LikeLiked by 5 people
Good luck my dear! You’ll do great! And you can use any type of nut that you like if black walnuts seem too daunting! Keep us posted!
LikeLiked by 1 person
Omg! These are so cute. I have to make these for Christmas dinner!
LikeLiked by 4 people
Oh that’s lovely! Dessert will never be more snowy then these guys:) Cheers to you and a delicious Christmas dinner!
LikeLiked by 2 people
I feel like Christmas came early! I just love your site, and am so happy to have found it! 🙂
LikeLiked by 4 people
Oh thank you so much! So glad to meet you as well!
LikeLiked by 2 people
🙂
LikeLiked by 4 people
Really yummy!!! nice pics too…
Thanks for sharing!
LikeLiked by 5 people
Thanks so much my dear! Happy holidays!
LikeLiked by 1 person
Reblogged this on Cleaning Service in the Stockholm.
LikeLiked by 5 people
Thank you so much for sharing the link!
LikeLiked by 1 person
My mother-in-law introduced me to Mexican Wedding Cakes over fifty years ago. Your post was delightful and brought back fond memories. Gonna make some tomorrow or Friday!
LikeLiked by 5 people
Oh how exciting! It is so nice to read that they have been classics in your family as well. Have fun baking!
LikeLiked by 2 people
Reblogged this on Josh Brandwene | New Mexico.
LikeLiked by 4 people
Oh that is so kind – thank you so much!
LikeLiked by 1 person
Thank you so much for sharing the snowman! Cheers to you!
LikeLiked by 1 person
Very good post!Welcome fakanal01 caffee.Thanks!
LikeLiked by 3 people
Thank you so much for popping in to say hello!
LikeLiked by 1 person
Thank you so much for sharing the link!
LikeLiked by 2 people
We called the snowballs when I was growing up and they were my favorite ones to make and eat. 💕
LikeLiked by 3 people
Snowballs! Another fun name to add to the list. Thanks for sharing!
LikeLiked by 1 person
Adorable snowmen.
LikeLiked by 4 people
Thank you thank you my dear! Three cheers to you from the snowy sweet snowmen:)
LikeLiked by 2 people
These are so cute!!
LikeLiked by 3 people
Awww…thanks so much – you’ve made the snowmen blush!
LikeLiked by 2 people
these look so cute made me smile 😀
LikeLiked by 1 person
So glad! The snowmen do have a magical ability to brighten up all spaces and faces! Thanks for popping in to say hello!
LikeLiked by 2 people
Yum!!! I am excited to try these out!! I am making Snow Ball cookies right now and was thinking of making them into a little Snow Man! Great post!!
LikeLiked by 1 person
Oh how fun! From our little snowmen to yours – cheers for a most delicious holiday!
LikeLike
I make these every year and really like the idea of the snowmen! I use hazelnuts in my version.
LikeLiked by 1 person
Oh hazelnuts! Great idea! Those will inspire our next batch. Thank you so much for sharing!
LikeLike
Super fun and adorable!
LikeLiked by 1 person
Oh thank you so much for your kind words! Cheers to you for the happiest of holidays. Much love from the snowmen and the Vintage Kitchen.
LikeLiked by 1 person
Great article
LikeLiked by 1 person
Thank you so much!!! Sending you lots of holiday cheer from the Vintage Kitchen!
LikeLike
Thanks
LikeLike
Wow!!Some amazing stuff cooking… I am gonna tell my mom to make it just like this…Loads of love…Keep spreading happiness❤❤
LikeLiked by 1 person
Oh how fun! Happy baking to you and your mom!
LikeLike
Nice looking snowman on the thumbnail
LikeLiked by 1 person
Thank you so much! Cheers and happy holidays to you!
LikeLike
Oh my God I can almost smell the scent right now.. My grandmother and me made this when I was a little girl. Good times, brings so many happy memories. 😊 My favorite photography is at the end… So creative and well put together for presentation ❤
LikeLiked by 1 person
So glad this post brought back such good memories you and your grandmother. How lovely! Thank you so much for your kind words. Wishing you the most delicious holiday season with love from the snowmen and the Vintage Kitchen.
LikeLike
These are the CUTEST edible snowmen I’ve ever seen !!
LikeLiked by 1 person
Oh that is so kind! Lots of love and good cheer to you from the snowmen and the Vintage Kitchen!
LikeLike
This is so lovely and they look so cute xxx
LikeLiked by 1 person
Thank you so much! Happy holidays to you with much love from the snowmen and the Vintage Kitchen!
LikeLike
Isn’t it fun to play with your food! Great shots and there is probably a story behind the sad snow face. I am an avid recipe collector and hold onto a few of my mom’s ancient 50’s recipe pamphlets for the memories they bring from days gone by …as a child. Thanks.
LikeLiked by 2 people
Hello hello my dear! That is marvelous that you still have your mom’s mid-century recipe pamphlets. Have you done much cooking from them? I think the sad little snowman was just a bit camera shy. That was a big day for him with the sugar snow storm, coming to life and a photo shoot all happening over the course of one day. You’ll be happy to know he’s much smilier now:)
LikeLiked by 1 person
Maybe I should try one of those funky looking cakes from the 50’s, especially after reading your post on the Case Study of 1950’s food photography. Ahha so maybe the photo was throwing me off, you know the strange colors and all. Mind you I study recipes so the ingredients speak to me too and that is why I held on to those old fashioned recipes. If I get around to baking one I will definitely post it and send you the link of the before and recent photo;)
LikeLiked by 1 person
Oh that would be fantastic to learn more about your before and baking adventure. please do keep us posted! Happy baking!
LikeLike
Those snowmen are adorable! We always make what we call Snowballs for Christmas–they look the same as the Russian Tea Cakes. I never thought to make them into a snowman, though!
LikeLiked by 1 person
Oh I just love how there are so many different names for these cookies! Snowballs are definitely an appropriate moniker – maybe these little guys will become a new tradition in your house too. Thanks so much for popping in to say hello!
LikeLiked by 1 person
These are so cute!
LikeLike
Thanks so much! Happy holidays from the Vintage Kitchen!
LikeLike
Awwwww so cute
LikeLike
A big thank you from the snowmen and the Vintage Kitchen!
LikeLike
I would love to make these Russian tea cakes into a snowman.
LikeLike
You should do it! It’s definitely a very fun way to pass an few festive hours in the kitchen!
LikeLike
Looks delicious! Happy holidays!
LikeLiked by 1 person
Thank you so much! And happy holidays to you as well. Hope your days are filled with delicious treats.
LikeLike
they’re lovely! sooo gonna try them!
LikeLike
That’s marvelous! Keep us posted on how it goes! Happy baking:)
LikeLiked by 1 person
Thanks for sharing the link!
LikeLike
LikeLiked by 1 person
Thank you so much for the re-pin! Cheers and Happy New Year!
LikeLike
These are adorable, and they look delicious!
Do you deliver?
LikeLiked by 1 person
Oh thank you so much! I’m afraid the little snowmen aren’t great travelers but thank you for inquiring!
LikeLike
Really nice ….my fav..is moms ..Do u know how to prepare it…
LikeLiked by 1 person
If know ..reply me on..www.youtube.com/hikeladakh
LikeLiked by 2 people
Thank you so much for popping in to say hello! I don’t know it – but I’ll check out your link!
LikeLike
These little snowmen are the cutest things! Love the little orange peel scarves! 🙂
LikeLiked by 1 person
Thank you so much for your kind words! We had just finished making a wild rice salad the day before, which called for several cups of freshly squeezed orange juice, so we had some extra oranges on hand. Lemon, lime and pomegranate peel could be a fun (and colorful!) option as well!
LikeLike
these are so cute! looks yummy!
LikeLiked by 1 person
Thank you so much! They are delish and really easy to make. Hope you get a chance to try them!
LikeLiked by 1 person
These are too cute! I’d love to say they are too adorable to eat but who am I kidding, these cookies are my weakness!
LikeLiked by 1 person
Awww thanks so much! They are our weakness too. We pretty much consumed a whole battalion of snowmen by the end of the December!
LikeLike
I grew up calling these Snowball Cookies. My mother and I would make them every year at Christmas. I love how you made them into snow people. 😄
LikeLike
Oh how fun. Isn’t it amazing how there are so many names for these guys?! If you do whip up a batch send us a photo – we’d love it to share it on the blog. In the meantime, thanks for popping in to say hello. It’s lovely to meet you. Happy baking!
LikeLiked by 1 person
I appreciate you taking the time to respond! Very nice to meet you as well!
LikeLiked by 1 person
Adorable! I so want to try this! 💖
LikeLiked by 1 person
Oh we hope you do. You won’t be disappointed, we promise. Happy baking!
LikeLike
That’s an idea for next winter. Thanks for sharing.
LikeLiked by 1 person
Or anytime you get a little hankering for a snow day! Thanks for stopping by to say hello!
LikeLiked by 1 person
Nice and apt title
LikeLiked by 2 people
Thanks so much!
LikeLiked by 1 person
Love this idea, these are so cute xx
LikeLiked by 2 people
Aww… thanks so much!
LikeLiked by 1 person
Love the way you’ve reinterpreted these snow balls! Very creative!
LikeLike
Thank you so much! They definitely came to life in their own whimsical little way:)
LikeLiked by 2 people
I really like watch or read cooking blogs. The steps you wrote are really in detail and clear. I hope I will make it by following your steps.
LikeLike
Hello and welcome! Thank you so much for stopping in to say hello. Don’t worry, the snowmen are pretty easy to make. If you have any troubles just let me know and I’ll be happy to help!
LikeLike