Meet Matilda: The Mid-Century Mixmaster


There’s a new gal in the Vintage Kitchen and her name is Matilda. Traveling all the way from 1957, Matilda is part of the Sunbeam Mixmaster fleet that was all the rage back in mid-century America.  Like the popularity of today’s counter-top Kitchen-Aid mixers, if you didn’t have your very own Mixmaster in the 1950’s then you definitely wanted one. This 1956 Christmas ad shows just how drool-worthy they really were…

Pronouncing lighter cakes, fluffier mashed potatoes and more velvety textures, Mixmasters were scientifically tested for proper mixing speeds and outfitted with full coverage beaters which set them apart from other leading competitors of their day. This was ingenious because early mixers often got stuck just whipping up contents in the center of the bowl, but Mixmasters special over-sized beaters worked the entire rim of the bowl as well as the center eliminating the need for home cooks to stop the mixer and scrape down the sides.  It is so easy to take this simple step for granted today but to fully understand the novelty of this ingenious appliance, we have to first travel back to the early 1900’s.

Born from sweaty bread, the first standalone mixer was invented by Herbert Johnson after he witnessed an over-exerted baker with a drippy forehead hand mix a batch of bread dough.  Clearly there was a better, more hygienic way than this, he thought and so he got to tinkering.  Eventually Herbert came up with the Hobart – the first mixer for the commercial baking industry. That was in 1914.

Hobart! Photo courtesy of kitchenaid

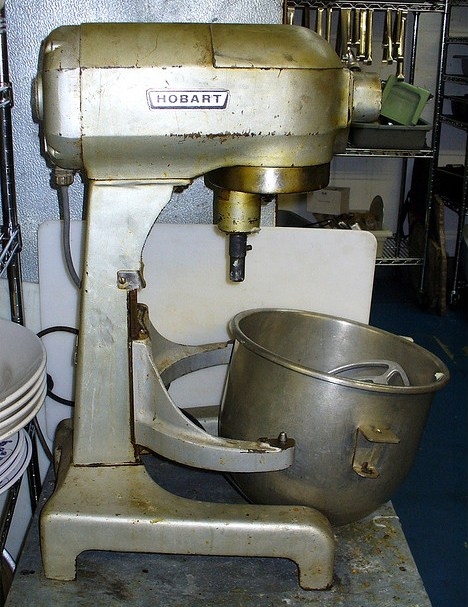
A speedy savior for anyone mixing large batches of anything, the Hobart came to be an important helper in commercial kitchens and rapidly shortened the time spent preparing food products for retail markets. It was so effective even the military put them to work.  A decade later home-sized versions named Kitchen-Aids were introduced and women around the country marveled at the speed and efficiency with which they could whip stuff up.

Sunbeam Mixmasters came along in the 1930’s and offered an improvement upon both the Hobart and the Kitchen-Aid varieties – interlocking yet detachable beaters. This meant even mixing and easy clean-up. Early models like this Mixmaster from the 1930’s look squat and a little primitive but they were true engineering marvels in their day.

Photo courtesy of Decodan.

Originally Mixmasters were first offered in white with jadeite mixing bowls but soon  graduated to a range of pastel colors with matching or milk glass mixing bowls. Matilda’s chrome style was introduced in the mid-1950’s and came with two bowls – large and small.

1950s sunbeam mixmaster

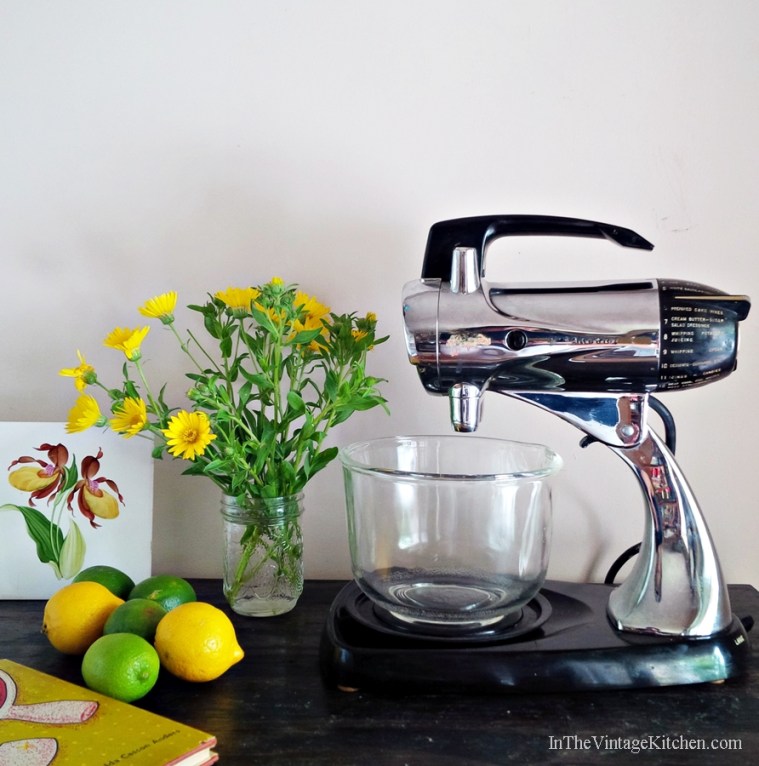
Inspired by both the automobile industry and the airline industry the Sunbeam design engineers created attractive models with elegant lines, fin-shaped dials and stylized lettering reminiscent of the latest design trends in transportation.

You can definitely see the car influence on the Mix-Finder dial and front end medallion…

Twelve separate mixing speeds debuted the year Matilda was born which offered the following settings…

  1. Dry Ingredients, Folding
  2. Blend Ingredients, Cookies
  3. Muffins – Quick Breads
  4. One Bowl Cakes
  5. White Sauce – Puddings
  6. Prepared Cake Mixes
  7. Cream Butter – Sugar, Salad Dressings
  8. Whipping Potatoes, Juicing
  9. Whipping Cream
  10. Desserts – Custards, Etc
  11. Icings – Candies
  12. Beat Eggs – Egg Whites, Most Attachments

On the attachment front – Mixmasters also offered a bevy of functionalities. Everything from juicing to funneling, meat grinding to nut chopping could all be accomplished with one base unit and the appropriate attachment. Depending on the design and the decade that they were introduced, some of the attachments proved invaluable and were successfully continued for future designs. Others like the glass juicer were discontinued after a short run due to fragile composition.

But when it came to the main mechanics of the Mixmaster body itself, they proved incredibly well made, thanks to the powerful motors that still hold up to the competition today. Which is exciting news for Matilda. She may be approaching the senior side at 60 years old but she’s still just as capable as ever. As a top of the line lady, she’s worked in some pretty great places but none hopefully will be more exciting or inspiring than her newly attained instructor’s position here in the Vintage Kitchen with us.

New decals coming soon!

For her birthday this year, Matilda’s going to get a little refresher in the decal department as well as a set of replacement beaters. Then she’ll not only be practically brand new but also fully capable of whipping up a whole new century’s worth of recipes here in the Vintage Kitchen. When she’s all dressed up again, I’ll snap a photo so you can see!

Looks aside, lucky for us, Matilda is chatty. In the whirl of her motor she shares the world of past baking endeavors through decades of cakes and cookies, casseroles and creams.  She can’t wait to share her favorite mixtures with you, so stay tuned for some stories.

Cheers to Herbert and Hobert for mixing it all up in the beginning. And a big welcome to Matilda  – the new master of all our mixing here in the Vintage Kitchen.

CURIOUS which modern-day mixer brands come out on top? Check out what the team at Reviews.com found out after they tested 12 different contemporary models here. Unfortunately, Matilda’s Mixmaster family didn’t make an impact on their top-three list, but that’s okay because she will always reign supreme in our Vintage Kitchen. Vintage mixmasters can be elusive little gems, so in case you can’t find your own vintage Matilda, reviews.com recommends a new-but-looks-retro mixer, The Smeg, which they voted one of the top three stand mixers in both style and performance.


Advertisement

Wednesday Night in the Kitchen: Wonderful Whoopie Pies

Last night  Ms. Jeannie had a craving for a little dessert. So she pulled out her recipe books and flipped through the pages to see what jumped out at her. As luck would have it, she discovered she had all the ingredients on hand to make Whoopie Pies, one of Mr. Jeannie Ology’s favorites.

If you’ve never had a Whoopie Pie, it is kind of like a cross between a homemade oreo cookie, an ice cream sandwich and cake. Here’s a picture of one from Ms. Jeannie’s batch…

Ms. Jeannie’s Homemade Whoopie Pies

It is essentially a whipped peanut butter cream filling sandwiched between two chocolate cake mounds.  You can use all sorts of different types of filling (sweet cream, mint, maple cream, etc) but Mr. Jeannie Ology is such a nut for peanut butter, she decided to surprise him with a little sweet treat.

Originally made famous by the Pennsylvania Dutch, Ms. Jeannie first learned of whoopie pies when she visited Amish Country in Lancaster County, Pennsylvania years ago.

While flipping through Martha Stewart Living magazine some years later, Ms. Jeannie came across the recipe. So that’s the one she uses. You’ll find that version of the recipe listed at the bottom of this blog post.

Ms. Jeannie’s platter of whoopie pies. There were a few more in the batch that got eaten before the photoshoot:) That Mr. Jeannie Ology – he just loves them!

Sources trace the first whoopie pie back to the early 1920’s.  Named from the sheer delight of discovering such a treat, eaters of the delicious dessert often said “whoopie” when they were offered one to enjoy.

Both Maine and Pennsylvania are the state leaders when it comes to the commercial production of the whoopie pie. Maine loves them so much they are considered the official state treat.

Labadie’s Bakery in Maine has been making whoopie pies in the same location since 1925!

Labadie’s Bakery – Lewiston, Maine

And every September in Pennsylvania, in the heart of Amish Country, occurs the Whoopie Pie Festival, where people participate in all sorts of challenging feats like the whoopie pie treasure hunt, the whoopie long shot, whoopie checkers, whoopie yell off, whoopie pie eating contest and more!

The Annual Whoopie Pie Festival in Strasburg, PA. This year scheduled for September 15th, 2012.

It’s an easy dessert to make and a fun project for little ones., since they can help spread the filling and make the “sandwiches”. Etsy has all the equipment you need to make your own batch of wonderfully delicious whoopie pies. All you need are the following…

Two mixing bowls:

Two Milk Glass Mixing Bowls from mothrasue

One hand held mixer or stand alone electric mixer (this one comes with both!)

Vintage Hamilton Beach Mixer from AttysVintage

One wire whisk:

Vintage Copper Wire Whisk from thebluebirdstudio

One large baking tray:

Vintage Bakery Tray from cheryl12108

One wire cooling rack:

Vintage French Wire Cooling Rack from stilllifestyle

One spatula:

Green Bakelite Vintage Spatula from efinegifts

Or for those that aren’t the baking sort, you can buy them already made in a variety of flavors!

From original…

3 Month Supply of Whoopie Pies from BundlesBakeShop

to red velvet…

Gourmet Red Velvet Whoopie Pies from CandyCakeTruffles

to vegan pumpkin cinnamon…

Vegan Pumpkin Cinnamon Whoopie Pies from LoveThyBaker

to lemon buttercream…

Lemon Whoopie Pies by radicalculinary

to tropical…

Tropical Whoopie Pies with Pineapple and Macadamia by VeganVille

Either way, whether you decide to make them yourself or by them already prepared you are in for a sweet treat!

Here’s the recipe that Ms. Jeannie used. Many thanks to Martha Stewart for incorporating the peanut butter:)

Peanut Butter Whoopie Pies –

Makes 18 Cookie Sandwiches

Ingredients

  • 1 3/4 cups all-purpose flour
  • 3/4 cup unsweetened cocoa powder (not Dutch process)
  • 1 1/2 teaspoons baking soda
  • 1/2 teaspoon fine salt
  • 4 tablespoons unsalted butter, softened
  • 1/4 cup vegetable shortening
  • 1/2 cup granulated sugar
  • 1/2 cup packed dark-brown sugar
  • 1 large egg
  • 1 cup whole milk
  • 1 teaspoon pure vanilla extract
  • Peanut Butter Buttercream
  • 2 ounces bittersweet chocolate, finely chopped

Directions

  1. Preheat oven to 375 degrees. Line two large baking sheets with parchment paper; set aside. Sift together flour, cocoa, baking soda, and salt into a small bowl; set aside.
  2. Add butter, shortening, and sugars to the bowl of an electric mixer fitted with the paddle attachment; cream on high speed until smooth, about 3 minutes. Add egg; beat until pale and fluffy, about 2 minutes. Add half the flour mixture, then the milk and vanilla; beat until combined. Add the remaining flour mixture. Beat together, scraping down sides of bowl with a rubber spatula as needed.
  3. Drop 12 slightly rounded tablespoons of batter 2 inches apart on each baking sheet. Bake the cookies in the upper and lower thirds of oven, 10 minutes; switch the positions of the baking sheets, and rotate each one. Continue baking until the cookies spring back to the touch, 2 to 4 minutes more.
  4. Remove from oven; let cookies cool on baking sheets, 10 minutes.Transfer with a metal spatula to a wire rack; let cool completely. Meanwhile, line a cooled baking sheet with a new piece of parchment; repeat process with remaining batter.
  5. Spread 1 scant tablespoon buttercream on flat sides of half the cookies.Top each with one of the remaining cookies, flat side down, and gently press together. Transfer pies to a tray.
  6. Melt half the chocolate in a saucepan over low heat, stirring until smooth. Remove from heat; add remaining chocolate, and stir until melted and smooth. Transfer to a pastry bag fitted with a plain round tip (Ateco #2 or #3) or a small parchment cone. Pipe chocolate in a spiral pattern on top of each pie. Let chocolate set before serving, about 1 hour.

BLOG UPDATE! A lovely reader wrote in to say that Maine has its own Whoopie Festival too! This year, the  Maine Whoopie Pie Festival is held on June 23rd from 10:00am – 4:00pm in Dover-Foxcroft, Maine.

Like the Pennsylvania Whoopie Pie Festival, there is a bevy of themed activities, but one of the most creative is the Whoopie Pie Trail which takes you on a tour of several bakeries in the Dover-Foxcroft area. This sounds like one delicious way to spend an afternoon!