Happy Easter! Hope everyone is enjoying a lovely day filled with little whimsies and delicious treats. Our table centerpiece this holiday was inspired by the 1939 children’s book, The Country Bunny and the Little Gold Shoes. If you aren’t familiar with the book it’s a story about a mama bunny who wants to become one of the five Easter bunnies that deliver eggs to children all over the world.
The Country Bunny and Little Gold Shoes by Dubose Heyward
Traditionally, the five Easter bunnies have always been boys. They chide Mama Bunny for wanting to become one of them, not only because she is a girl but also because she is from the country and not as sophisticated as their city selves.
The boy bunnies – handsome in appearance but antiquated in their thinking.
Mama doesn’t let those boy bunnies stop her. And they don’t. Following her dreams isn’t easy but with the help of some golden shoes she proves everyone wrong and delivers the last, most beautiful egg of the season to a brave little boy who has battled a sickness for a long, long time.
Even though this book was written 79 years ago, the story seems especially fitting this year with the rise of women and the empowerment that we are all feeling. To stand strong, t0 be ourselves and to realize our dreams are all the same things the country bunny wanted for herself. It is such a hopeful story. And this, a hopeful time of year when nature is blossoming and new ideas are being born.
The handpainted golden eggs of our holiday table are a small homage to the Country Bunny and her perseverance to never give up on what she decided was important, no matter what anyone else said. The eggs are fragile, but dreams are strong, and the meanings behind them powerful. On this hopeful holiday, we are raising a glass to all the ladies out there going after their dreams. Mama Bunny would be so proud of you and we are too.
Happy holiday all you adventurers. May you achieve all that you desire.
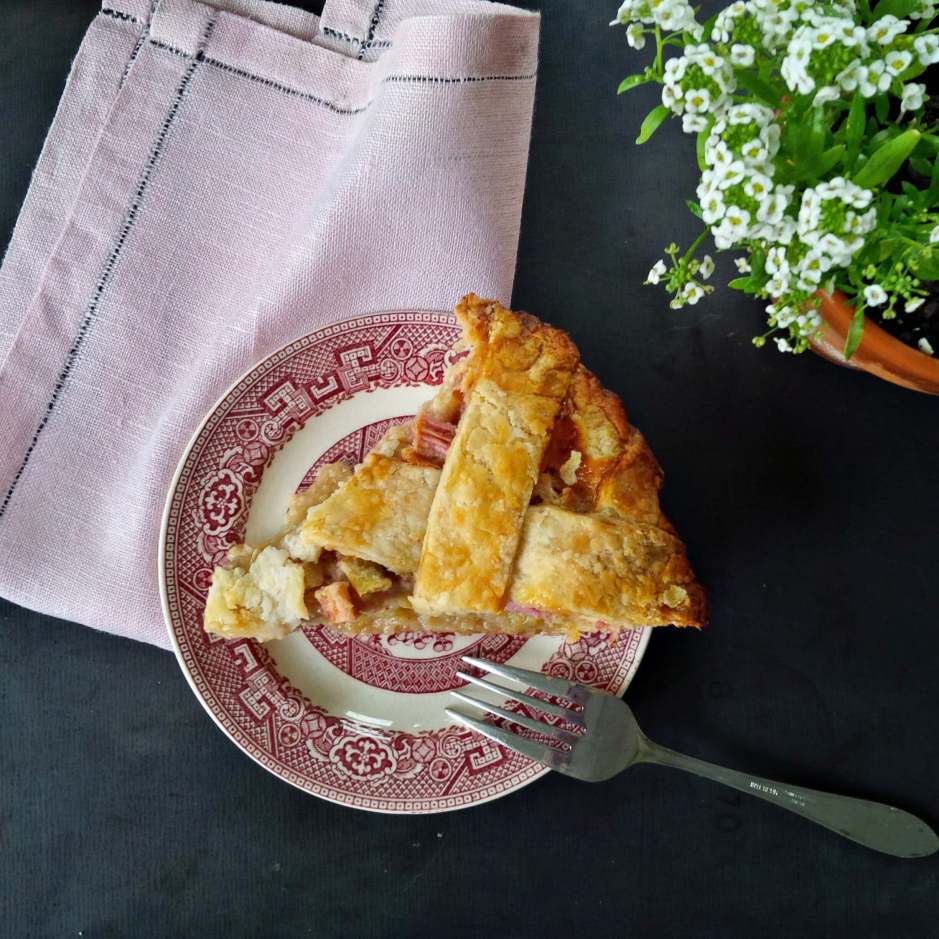
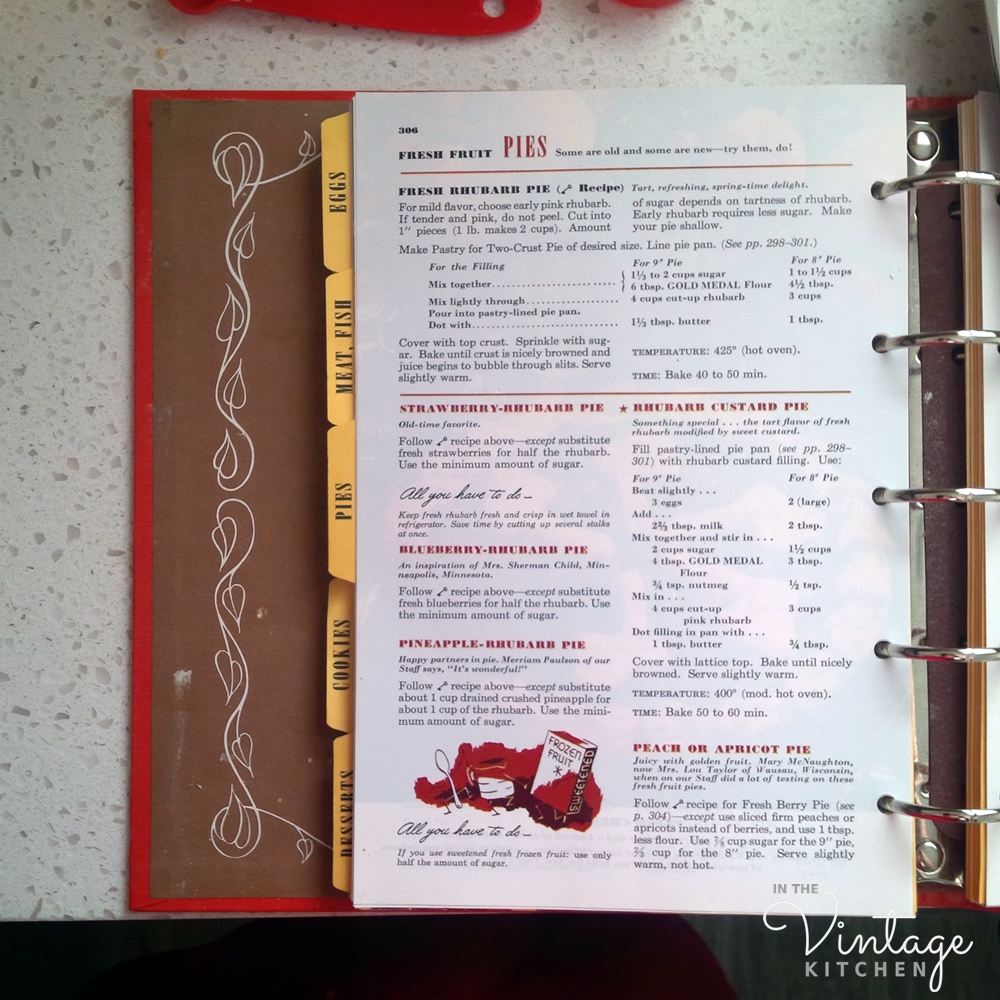
If you are looking for a fun dessert to make for Easter dinner or you are heading out to someone else’s house for the holiday and want to bring something new (but old) along, we recommend the little known but amazingly delicious Rhubarb Custard Pie. It has been an Easter tradition in my family since the 1960’s when my mom first started making it with the help of her husband’s grandfather’s homemade pie crust recipe and Betty Crocker’s 1950 Picture Cookbook.
Rhubarb in its natural state.
Rhubarb is one of those quirky vegetables. Some people call it pink celery. Understandably, it really does resemble the green hued variety with its long stalks and tufted green leaves. But rhubarb is actually part of the buckwheat family and celery is part of the parsnip family so their similarities end at face value. Unlike the subtle soapy taste of celery, rhubarb is tart like a Granny Smith apple and more spongey in texture than a crisp stalk of celery. It’s ideal baking consistency is soft like a ripe pear with a bright white interior and a pale pink exterior. The general rule of thumb when it comes to selecting rhubarb for purchase is the firmer and redder the stalk the tarter the taste. Ideally, you want something in-between – slightly spongy to the touch and a 40/60 ratio of stalks ranging from deep red to pale pink for dynamic flavor.
Two important factors go into making this pie a repeat favorite year after year – the filling and the pie crust. Most people (and pie recipes) pair rhubarb with fresh strawberries, which is a good Spring combo since both are usually in season at the same time. Sometimes though, these two put together can result in a watery pie which makes the crust soggy and each bite extra drippy. The secret addition to the rhubarb custard pie is the eggs. They act like a binder holding everything in place, so that you get all the sweet-tart taste of the filling without the thin and liquidy consistency. Betty Crocker’s 1950’s version is easy to prepare and always delicious.
The second important factor to this pie (and to all pies, really) is the homemade pie crust. It only takes about 10 minutes and four ingredients to make no-fail pie dough and it cooks beautifully and consistently every time. Passed down through the generations, this recipe is so good it has been in active use in my family for almost 100 years thanks to this guy who taught everyone how to make it in the very beginning…
Bacon & Dolly Day in Montana circa 1950’s/1960’s
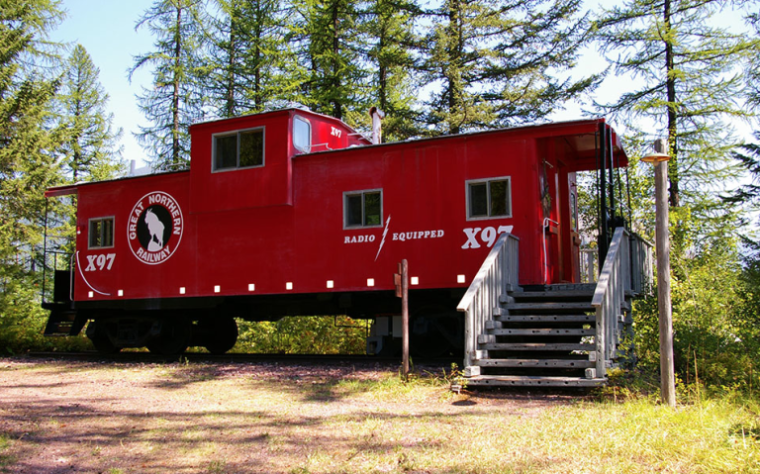
Meet Bacon Day and his wife Dolly. Bacon (yes, that’s his real name!) first moved to Montana in the 1920’s where he married his bride, Dolly, in Missoula and went straight to work in the rural mining town of Gold Creek, as the train depot clerk for Northern Pacific Railroad. The railroad was so eager to have Bacon join the team, that they gave he and Dolly two railcars to live in and set up homekeeping. Bacon was originally from St. Paul and Dolly from Seattle, so this railroad life was a whole new and exciting adventure for the newlyweds.
1930’s Northern Railroad travel poster
We don’t have any pictures of Dolly and Bacon in their rail car housing but we can imagine that it looked something like these two (now serving as luxury hotel accommodations in Montana)…
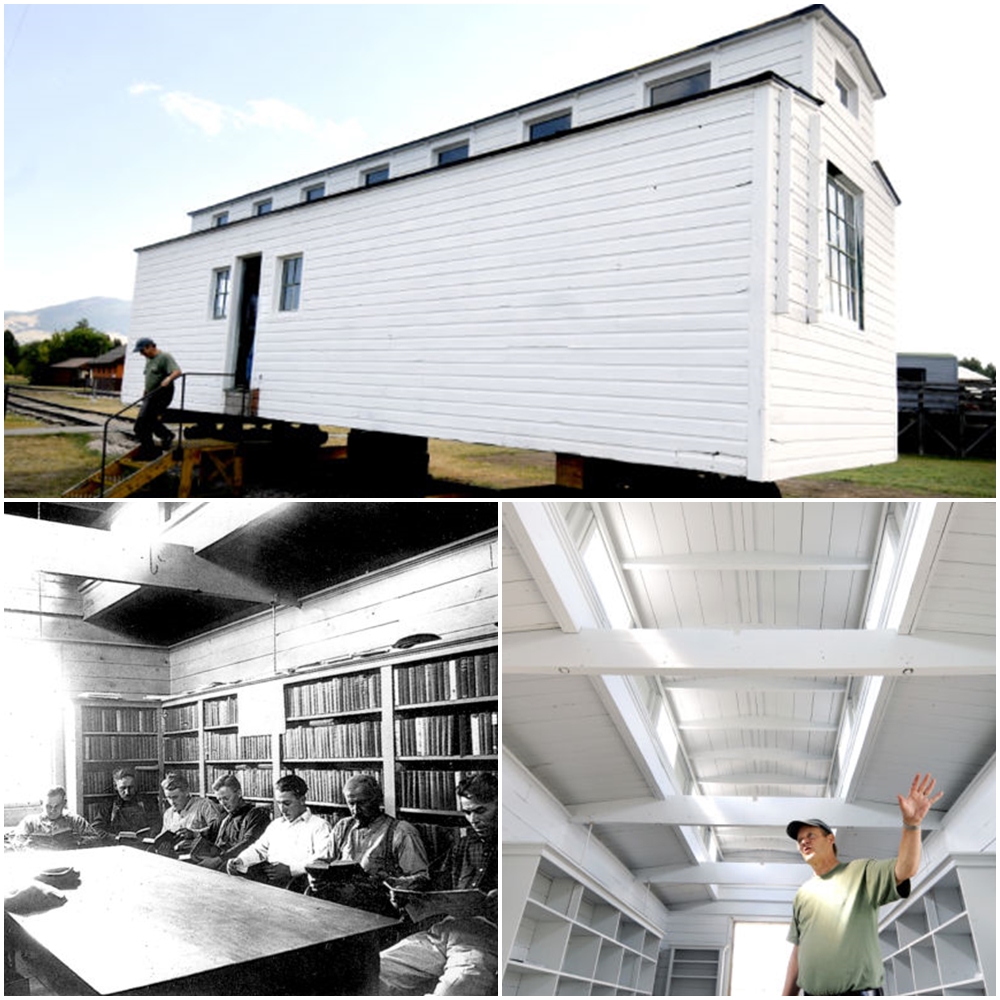
Or maybe it looked something like the rail car library built in 1926 that serviced the reading needs of Montana’s lumberjack and logging communities…
Library rail car built in 1926 to serve the literature names of logging camps in early 20th century Montana. Read more about the library car here.
Either way, it must have been a pretty unusual first home for Bacon and Dolly, and a pretty unusual life for two people new to a state that was not quite yet developed. 1920’s Montana wasn’t for the timid or the faint of heart. Interesting but also tumultuous, it was stunning in topography, erratic in business opportunity, progressive in gender equality and rebellious when it came to law and decorum. Especially when it came to train life.
Northern Pacfic Railroad Advertising 1910-1920’s
When the railroad companies first started building tracks out west with the ultimate goal of connecting the East coast to the West coast, Montana was marketed to new settlers as a land of stunning beauty and abundant farming opportunities. Homesteaders came from the East coast with intentions of building farms, raising livestock and growing food for commerce. But when these newcomers arrived they experienced a climate far different then what they knew back home. The winters were longer, the temperatures were colder, the open prairies were vast and resources were scarce forcing everyone to be immediately self-reliant. By the early 1900’s, livestock brought in from the East (mostly cows) had arrived in such excess they depleted the natural prairie grasses and upset the delicate balance of the natural eco-system, basically reducing the landscape to bare patches. Add-in an almost decade-long drought that occurred in the 1920’s, and the typography of Montana came to look more like a dessert of death than a lush and verdant valley of promise that all the postcards had been promoting..
Butte, Montana postcard from the 1920’s
The rail companies wanted to keep tourism and homesteading moving through the state though, so they would pay local homesteaders $1000 to grow the most attractive crop they could manage from the poor soil and then took those displays back East to show people how wonderful the agriculture was in Montana.
Montana Homestead Poster
This unscrupulous marketing ploy worked, and new settlers came by the train-full to start a fresh life in green and growing Montana. Only when they got they got off the train, they could see the landscape was devasted and the dry soil virtually unmanageable. Bacon, in his train depot office, would have been witness to all the excitement and disappointment that came through his station, especially when he worked in Gold Creek which was known for its gold mining potential.
Eventually, all this agriculture business got sorted out once the rains came and residents were properly educated on how and what to grow in this new environment. Montana began to thrive once again. Leaving Gold Creek, Dolly and Bacon moved on to settle into another rural rail town, Phillipsburg, where Bacon worked as a train conductor on a transportation line for livestock and mining equipment.
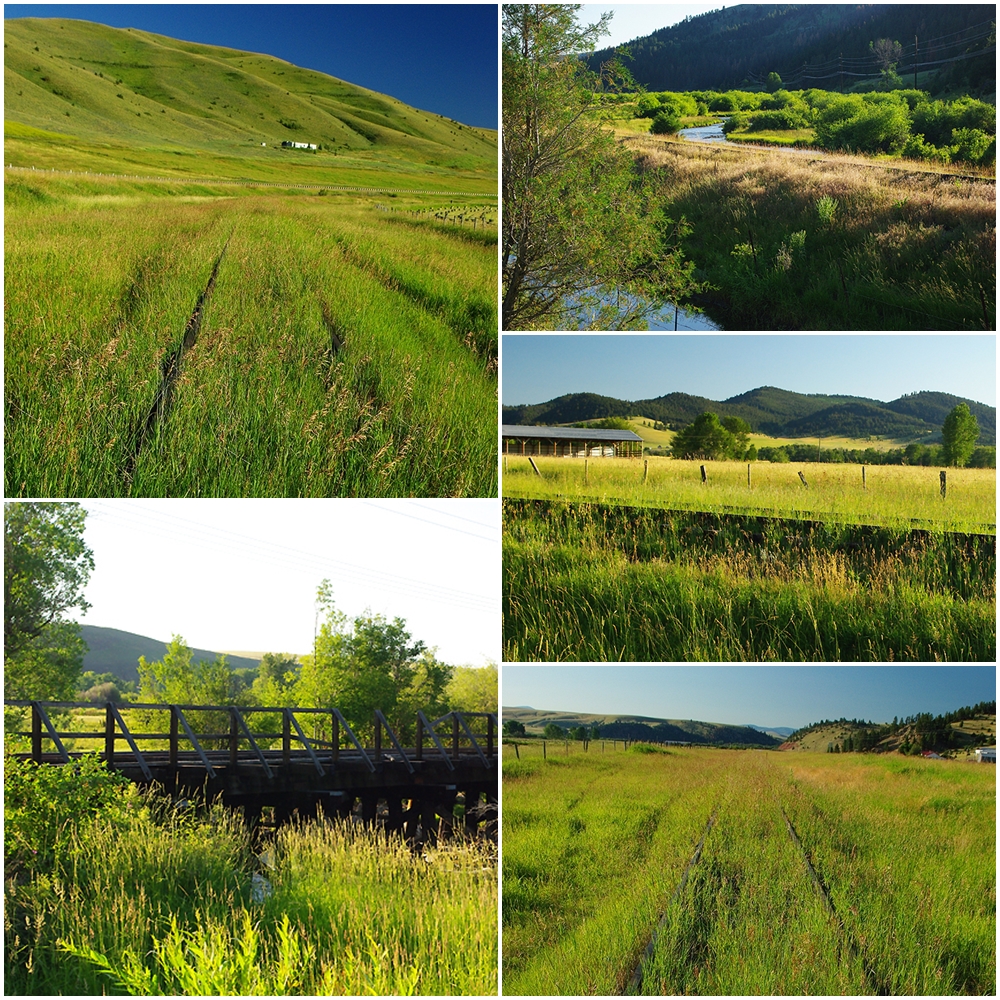
Now an abandoned track, these are recent photos of the train line running through Phillipsburg with views that Dolly and Bacon would have seen on a daily basis. Photos courtesy of D & D Travel.
From their wedding forward, Bacon and Dolly lived in Montana and loved it. Dolly often wrote poems about the natural beauty of her surroundings. They both mastered baking – Bacon with his pies and Dolly with her bread. Stories have been passed down that tell of breakfast at their house – often fresh caught trout and a homemade loaf of bread, served possibly with a slice of pie. For over 55 years, these two watched the growth and evolution of their marriage, their state, their family and their landscape all from the vantage point of the railroad tracks that ran through their lives and their hearts.
In some future posts, there will be more stories about Dolly and Bacon and their wild Montana life, but in the meantime, we have a holiday to celebrate and a pie to bake so it’s back to the rhubarb custard.
I recommend preparing the filling first. It can sit off to the side for a little bit while you make your pie crust.
Betty Crocker’s Rhubarb Custard Pie Filling
Makes enough filling for one 9″ inch pie
3 eggs
2 2/3 tablespoons milk
2 cups sugar (I use cane sugar)
4 tablespoons flour
3/4 tsp. nutmeg
4 cups chopped fresh rhubarb (about 8-10 long stalks)
1 tablespoon butter
Preheat the oven to 400 degrees. Wash, dry and cut the rhubarb into small bite-size pieces.
In a medium mixing bowl, beat 3 eggs slightly. Add the milk and then mix again before adding the sugar, flour and nutmeg.
Toss in the rhubarb and mix thoroughly. Then set aside while you make the pie crust.
Great-Grandpa Bacon’s Fool-Proof Pie Crust
2 cups flour
1/2 tsp salt
3/4 cup butter or shortening ( I always use butter)
1/2 cup ice cold water
1/8 cup milk (reserved until the end)
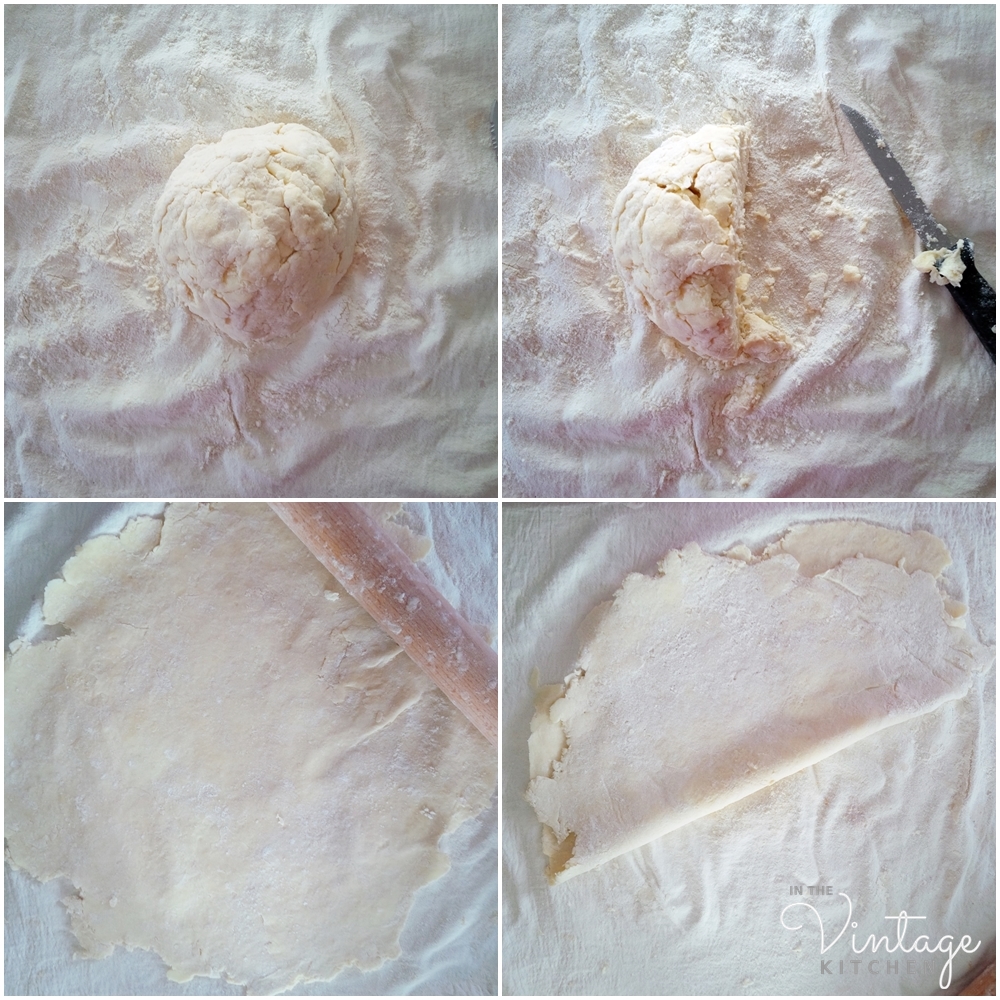
In a bowl, mix the flour and salt. Roughly chop the butter and add to the flour mixture. With a fork press the butter into the flour until the mixture resembles course meal. If its easier, you can also do this quickly using your hands – jus don’t crumble the butter so much that it starts to melt from your body heat.
Once the butter is mixed in, add the ice-cold water (the colder the water the better). Mix until the dough clumps together and you can easily form a crumbly yet cohesive ball.
Place the dough on a lightly floured pastry cloth, board or marble slab and cut in half with a sharp knife. Place one half of the dough ball off to the side. Roll out the remaining half of the dough with a wooden roller that has been dusted with flour. If you don’t have a wooden rolling pin you can use a wine bottle, or a cylindrical jar or vase (if you use either make sure to dust it with flour). Roll the dough out as much as possible without tearing it. Makes sure it is big enough to accommodate your pie dish. Once the dough is the right size, gently fold the dough in half on the cloth.
Line the crease of the fold line up with the center of your pie dish and gently lay the crust (still folded) down so that it covers just one side of your dish, then unfold the other half to cover the other half of the dish. There should be excess dough hanging off the sides of the dish. It should like this…
Pour the rhubarb mixture into the pie dish and set aside.
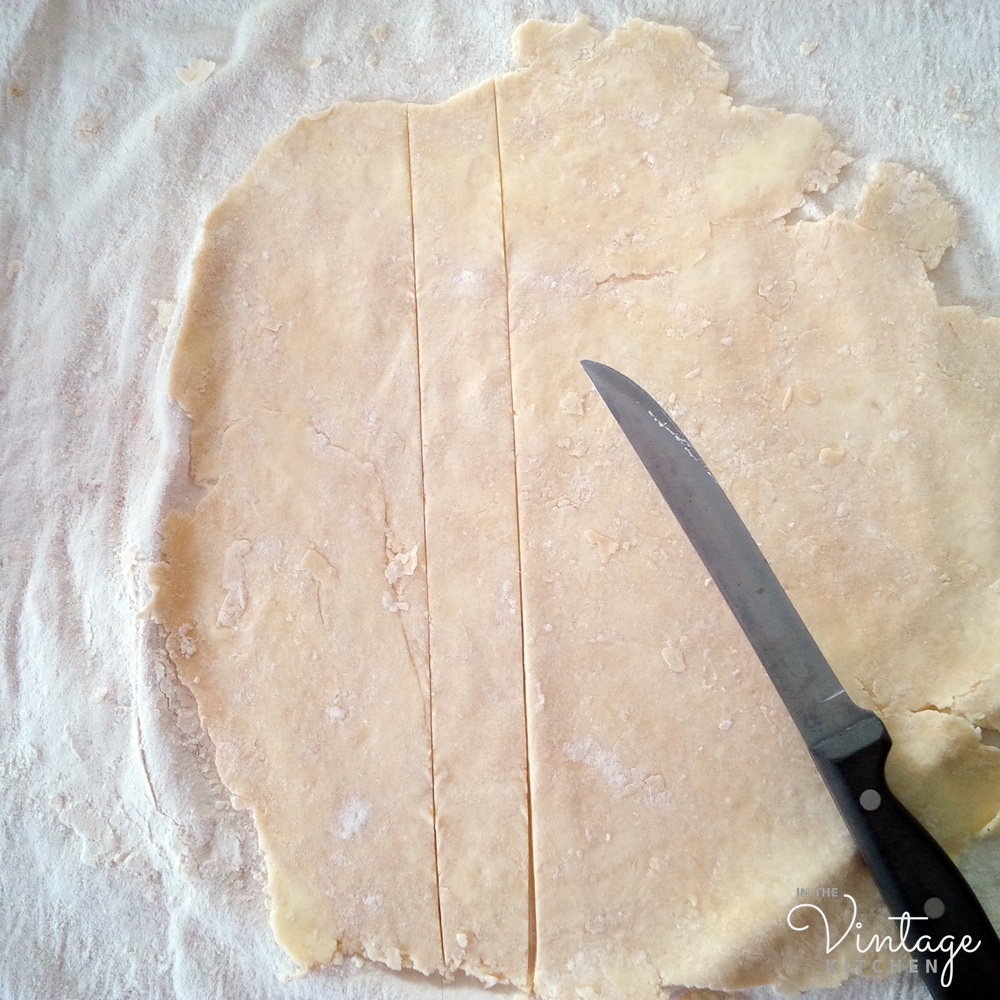
Next, in the same fashion as before, roll out the other half of the dough ball. In order to make a basket weave design for the top crust, you’ll need a sharp knife to cut strips of dough.
Place the first strip of dough vertically on the pie and the second strip of dough horizontally so that it forms a cross. Next weave the remaining strips in an over-under pattern, alternating each slice as you go.
Next, cut away the excess dough along the sides, leaving a collar of about 1 inch of extra dough all the way around the rim. Pinch the edges of the top and bottom crust together.
When finished dot the exposed holes with the remaining tablespoon of butter and brush the top crust lightly with milk.
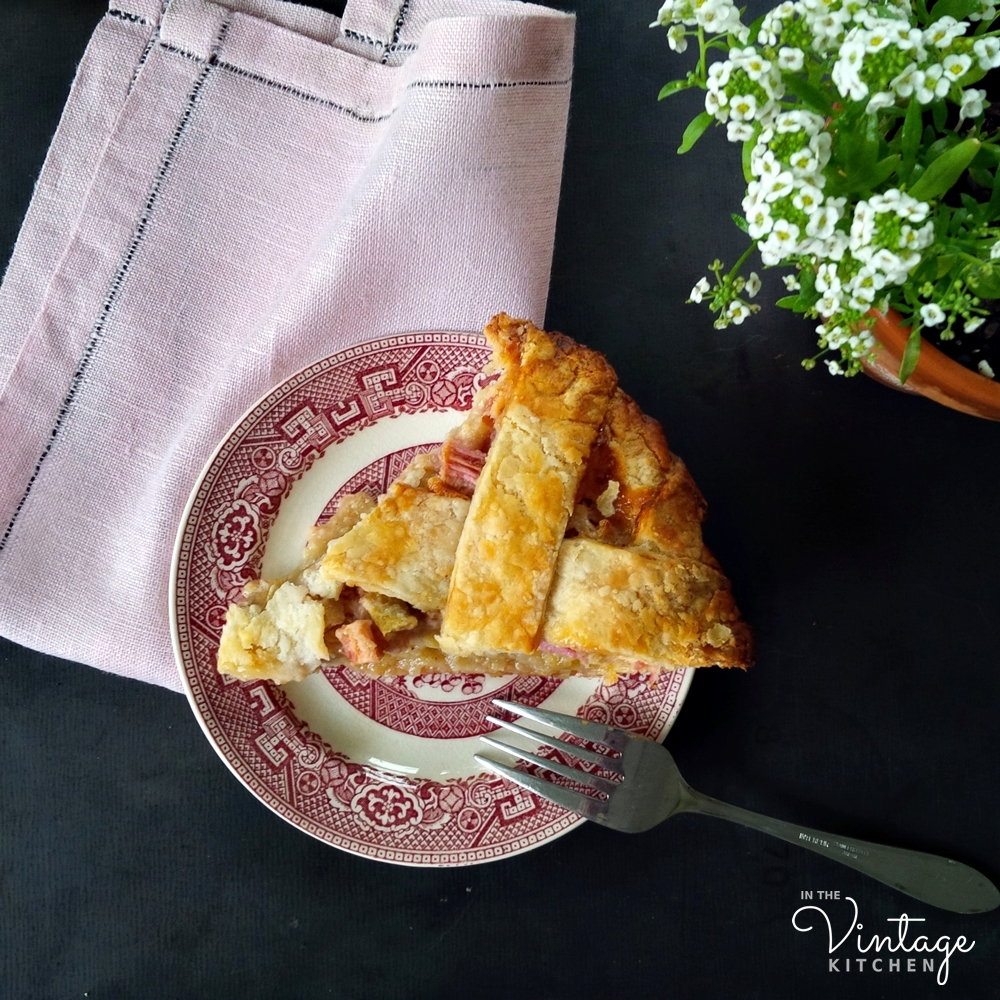
Bake for 50-60 minutes until the crust is golden brown and the rhubarb custard is bubbling. Let cool on a wire rack before serving. This pie is very versatile in the presentation department – serve it warm, cold or at room temperature.
Like pecan pie it is pretty sweet as it is, so you don’t need to add whipped cream or ice cream. Its ideal companion is a hot cup of coffee. And no one would look twice if you wanted to enjoy a slice for breakfast. Sometimes that’s the best time of day for a little decadence. If he was still alive, Bacon would be right there with you, enjoying a plate of breakfast trout.
If you get a chance to try this recipe, please let us know how you liked it. And if you have any questions on how to make your pie crust please comment below and we’ll get right back to you.
In the meantime, cheers to all the recipes that turn into traditions and cheers to Bacon and Dolly for always being a part of our most delicious holiday celebrations.
2024 Update!
This 2018 blog post became the linchpin in solving a mystery in 2021 surrounding a lost heirloom, and it’s 20 year journey back home to its original owners. It’s a true story of fate, family, persistence, and the incredible kindness of strangers that seems like something straight out of a fiction novel or a film, but it’s even better because it’s real life. Read all about it as the mystery unfolded in real time in our five part series on the blog starting here.
It just came to my realization that we haven’t done many dessert style recipes here on the blog, even though our instagram feed is full of vintage sweet treats that we have baked over the past two years. Today we are remedying that with a three piece recipe adventure just in time for Easter. I call it an adventure because I’d never charted these waters before, the journey wasn’t quite what I anticipated and surprise situations popped up right and left.
It all began with a 1960’s recipe that my grandmother had clipped from some unknown source and tucked inside her recipe box. When she passed away at the marvelous age of 97, I inherited her box and carefully preserved all the recipes in her own handwriting, while also pulling out all the collected newspaper/magazine/packaging recipes that sounded interesting. While looking through these the other day this one caught my eye…
Easy petit fours! A fun colorful dessert for the Easter holiday. Perfect! I know I’ve eaten petit fours before – in France when I was young and most probably at a wedding or two since, but I don’t actually recall the details of those desserts except of course they were made of tidy little packages and came in an array of Easter egg colors. My grandmother, Dorothy, never considered herself a confident cook (although everything she made was delicious) so the fact that this recipe was in her box and that it was labeled easy seemed the perfect foray into this age old French confection. With that in mind, I set off to make my very first batch.
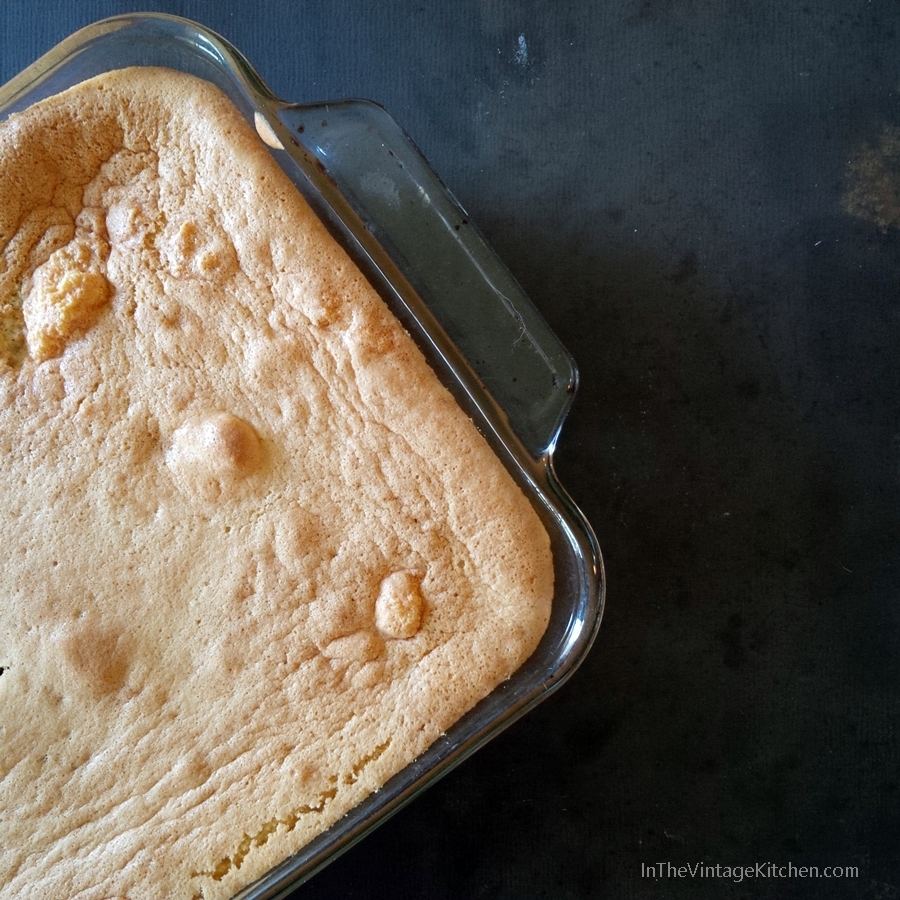
You’ll notice in the recipe above that the first ingredient is sponge cake – so I first started there, making a sponge cake from a recipe in Betty Crocker’s Picture Cook Book circa 1950.
Next I went on to make the buttercream frosting from the 1960’s-era Easy Petit Four recipe, which with its five ingredients was super quick to whip up. So far so good!
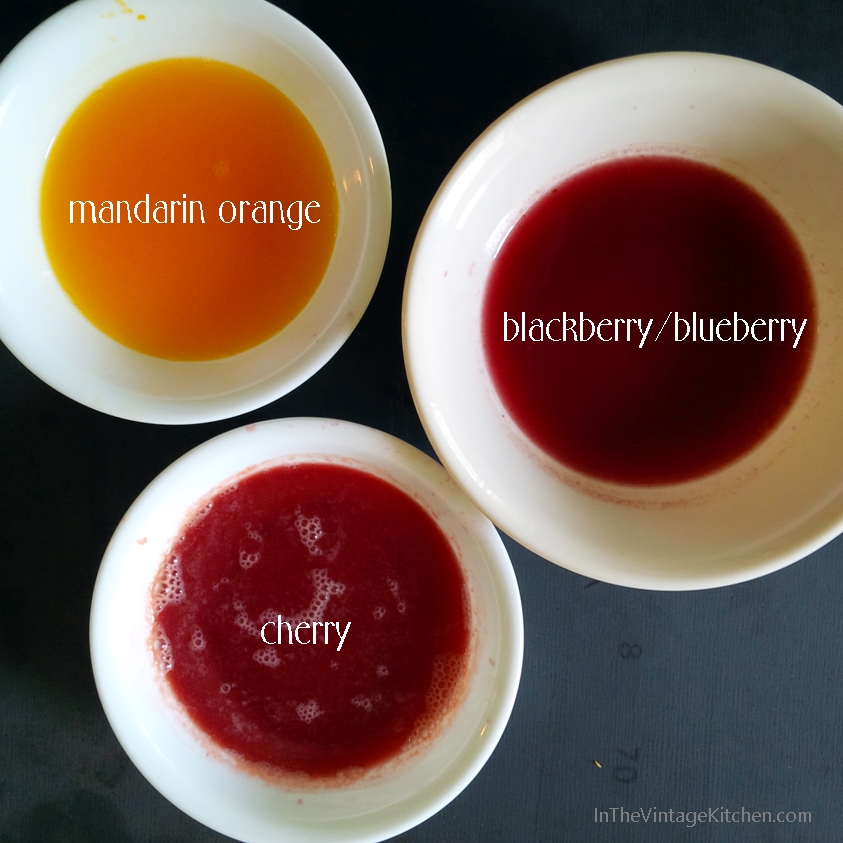
The Easy Petits Four recipe used food coloring to make the pretty pastel shades of this elegant, lady-like dessert. But not really a fan of the ingredients used to make food coloring (a mixture of mostly artificial and synthetic materials) I opted to create my own dyes using natural fruit juices. In my head pastel pink and orange seemed like a pretty arrangement so in the blender I finely chopped cherries for the pink and then manderin oranges for the orange and strained each into separate bowls using cheesecloth. As a just-in-case, I also, at the last minute, chopped and strained a batch of blackberries and blueberries for a purple shade if one of the other two colors didn’t work out.
This was where things started to get a little tricky. When I divided the buttercream into four separate bowls, and added a few teaspoonfuls of natural juice dye as the Easy Petite Four recipe suggested, the buttercream barely changed color. I added more juice dye and the color brightened but then the buttercream became too liquidy. So then I added more powdered sugar to bulk it back up again, which brought the buttercream color closer back to white again. You can see I had a situation on my hands. Setting these four batches of whites off to the side for a minute, I cut up the sponge cake into petite parcels and thought about some solutions to a bolder burst of color.
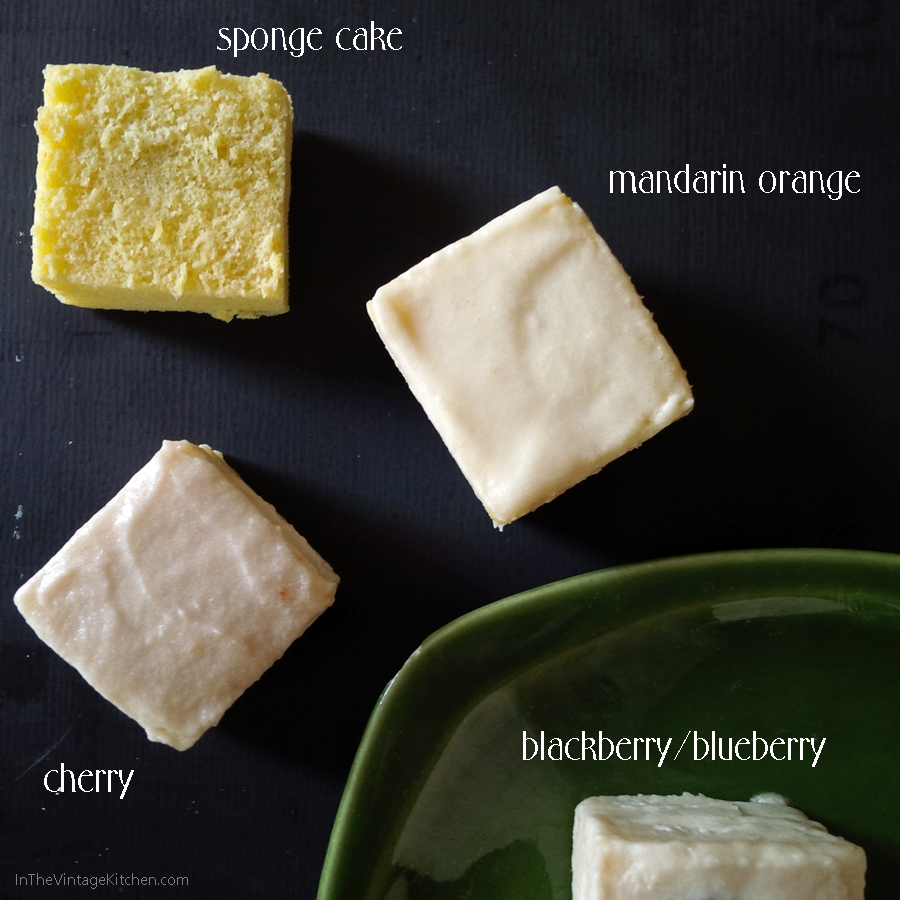
While I was cutting and the buttercream was resting, the colors in the bowl turned a little darker, so I trimmed up the little cakes into as even square shapes as possible (not the easiest of feats!)…
and set to work on frosting them to see what these buttercream versions would look like…
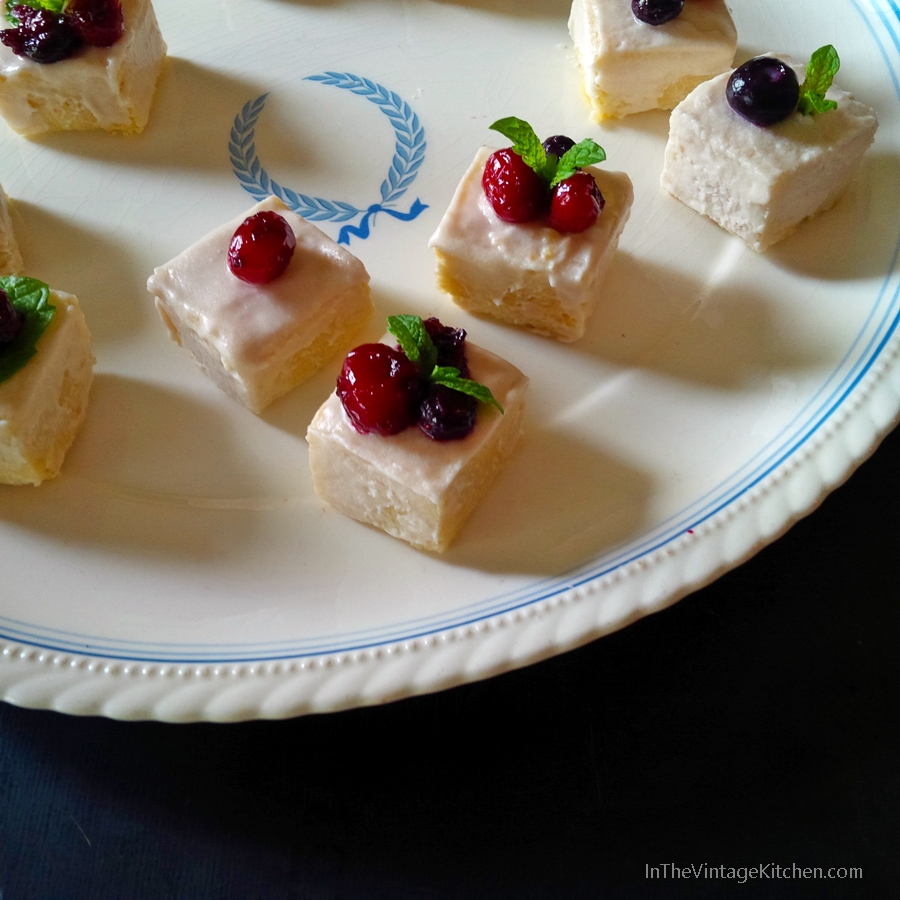
As you can see, there is slight (the slightest!) variation between all three frostings. Not exactly the dramatic shades I had in mind but at least they didn’t contain unnatural ingredients. By this point in the whole dessert endeavor I should have been ready to frost the rest of the batch, call this recipe done and serve them on a plate. The Easy Petit Four recipe suggested styling them with colored sugar or chocolate pieces or candied flowers. But because my frosting was a little mild on the color spectrum, I opted for a different topper – a mixed berry reduction and fresh sprigs of mint which would lend a spirited dose of revelry to this celebration. To the stovetop I went…
The colorful mixed berry reduction (a combination of red grapes, blackberries, blueberries, cranberries and raspberries) helped bring out the color in all the little petit fours and the flavors between fruit and cake were fresh and balanced. They definitely weren’t traditional but they were delicious. In the end these little bite-sized bundles turned out to be quite curious all on their own even though they didn’t wind up as originally intended.
Which goes to show you that you can still learn new things from old recipes! It also means the easiest route is not necessarily the most healthy route. And even though it took about a half day to work through the process of this vintage recipe, I came up with two other ideas in relation to other meals – one for an appetizer and one for an hors d’oeuvres (more on those latter this spring).
Like any travel adventure I started out on this journey thinking that I’d already know what my final destination would look like but somewhere along the way this kitchen trip side-stepped my plans and led me down another path from which I ended up returning wiser and more curious. Petits fours are part of French cuisine defined as small cakes baked in small ovens. Which means any cake-like dessert has a chance to be a petit four. What I thought of as a fairly traditional dessert with a singular style really has no boundaries – nut butter, chocolate, jam, fruit, honey, whip cream, herbs, vegetables all have the opportunity to be whirled up into a petite confection. So in this sense petite fours are very easy, very accommodating. The natural fruit dyes on the other hand are still a work-in-progress! If you have any recommendations or helpful hints, please share!
Below are the three recipes needed to make up the Vintage Kitchen’s version of a petit four. The 1960’s Easy Petit Four Recipe below has been adadpted to suit this new minty fruit-topped version. If you’d like to make the original mid-century version please consult the recipe photo near the top of the this post.
Betty Crocker’s Glorious Sponge Cake circa 1950
6 eggs
1 cup sifted all-purpose flour or 1 cup sifted cake flour
1 cup sugar
1/4 cup cold water
1/2 teaspoon salt
1 teaspoon lemon extract
1 teaspoon grated lemon rind
1/2 teaspoon cream of tartar
Preheat the oven to 325 degrees. Grease the bottom of a 13″x 9″ inch pan.
Separate the egg whites from eggs in two different bowls.
In a large mixing bowl beat the six yolks together until thick (at least 5 minutes).
Beat in gradually the sugar, then the flour and then the water, lemon extract and lemon rind.
In a separate mixing bowl combine the egg whites, salt and cream of tartar and beat until stiff.
Gradually and gently cut and fold the egg yolk mixture into the beaten whites. Pour into prepared pan and bake 30 to 45 minutes or until a knife inserted in the center comes out clean (depending on your oven this may take more or less time).
When cake tests done, invert and let hang until cold.
Easy Petits Fours circa 1960’s
1 sponge cake
1/2 cup butter
1 1/2 teaspoons vanilla
2 egg whites, unbeaten
1 lb. confectioner’s sugar, sifted
Few grains (one pinch) salt
Cut 24 petit fours from one sponge cake. Cream butter until light and fluffy; add egg whites, beat in. Add sugar and salt slowly while continuing to beat. Add vanilla. Divide frosting into 4 portions, leaving one white. With food coloring (or natural dye) tint the other portions pink, green and yellow respectively. Hold top and bottom of each cake between thumb and finger. Frost sides. Place cake on flat-surface and frost the top. Decorate with your choice of embellishments.
Mixed Berry Reduction
8 oz. of assorted fresh berries (the smaller in size the better!)
2 teaspoons butter
1/8 cup cane sugar
1/8 cup water
Fresh mint for garnish (the smaller the leaves the better)
Pinch of salt
In a small saucepan over medium heat combine the water and berries and bring to a simmer.
Add the butter, sugar and salt and toss to combine. Cover and reduce heat to medium low, stirring occasionally until some of the berries breakdown and form a thin sauce.
Remove the lid and stir until almost all the liquid has evaporated. Remove from heat, let cool completely before topping petit fours.