On the Grill in Autumn: Julia Child’s Soup in a Pumpkin

Rumor has it that one time when Julia Child made this recipe for dinner guests, she overcooked the pumpkin and the whole entire bottom of it fell out onto the floor on its way to the table. I mention this right off the bat, not to illicit alarm as to the perils that might befall cooks who attempt this recipe but to demonstrate the joy of Julia in all her humanness. Isn’t that what was so endearing about her to begin with? As experienced as she became, as attentive a cook as she was, as precise she always endeavored to be, Julia was still fallible just like the rest of us.

Julia in her kitchen in Cambridge, MA circa 1980s. Photo credit: Jim Scherer

Cooking mishaps and all, Julia’s golden rule in the kitchen was to have fun and enjoy the pleasures of preparing food and feeding people. Pour a glass of wine, engage in a little chit-chat, chop some vegetables, create a convivial environment. That was Julia’s way. Cooking is fun. Whatever situations happen along the path to culinary creation is part of the adventure.

That being said, this vintage recipe is one of the most interesting we have made on the blog to date. In part, because it is very fitting with the season which makes it very fun for fall, but also in part because we added a little twist, a bit of experimentation, based on our current kitchen renovation constraints. The recipe that we are making today, the one that hopefully will not end up on your kitchen floor, is Julia’s Soup in A Pumpkin from her 1989 The Way to Cook book…

Julia published this cookbook twenty-eight years after Mastering the Art of French Cooking debuted – the book which set her on the path to international acclaim. By the time The Way to Cook came out, Julia was in her late 70s and was most interested in producing a cookbook that showcased creativity in the kitchen for a younger generation. One that might not have experienced some of her older work. Based on her signature time-honored techniques, Julia featured a looser, more casual style of cooking instead of precise by-the-book formalities. More aware of health-conscious choices, she slimmed down butter usage and altered heavier recipes turning them into lighter, leaner, but still equally delicious offerings. She encouraged independent variety by suggesting alternative ways to serve dishes and was cognisant of budget and time-saving methods that would appeal to busy cooks who didn’t want to sacrifice quality meals for lack of adequate funds or hectic schedules. At the turn of every chapter, she championed experimentation and creativity.

In true spirit of the cookbook and Julia’s encouragement to amend, invent, and explore new ways of approaching meal preparation, we took her lead and added our own twist to her recipe by grilling the pumpkin outdoors instead of baking it in the oven indoors as Julia did.

While we have the ceiling in, the pantry framed out, and the exterior walls sealed up for the winter ahead, we are still hard at work on our kitchen renovations in the 1750 House. Photos of our work will be coming soon! In the meantime, currently, our fridge is in the living room, our sink is in the basement and we are without a stove, so the choice to grill the pumpkin came out of necessity but also curiosity. Can you even grill a pumpkin? We weren’t sure but we had Julia’s confidence and joie de vivre on our side, so we were ready to experiment with our trusty grill that has yet to disappoint us.

Rest assured, despite our change in cooking method and Julia’s tipple, this is not a difficult recipe to make and you don’t need to be nervous about executing it. It actually is quite a fun cooking adventure.

Soup in a Pumpkin made on the grill.

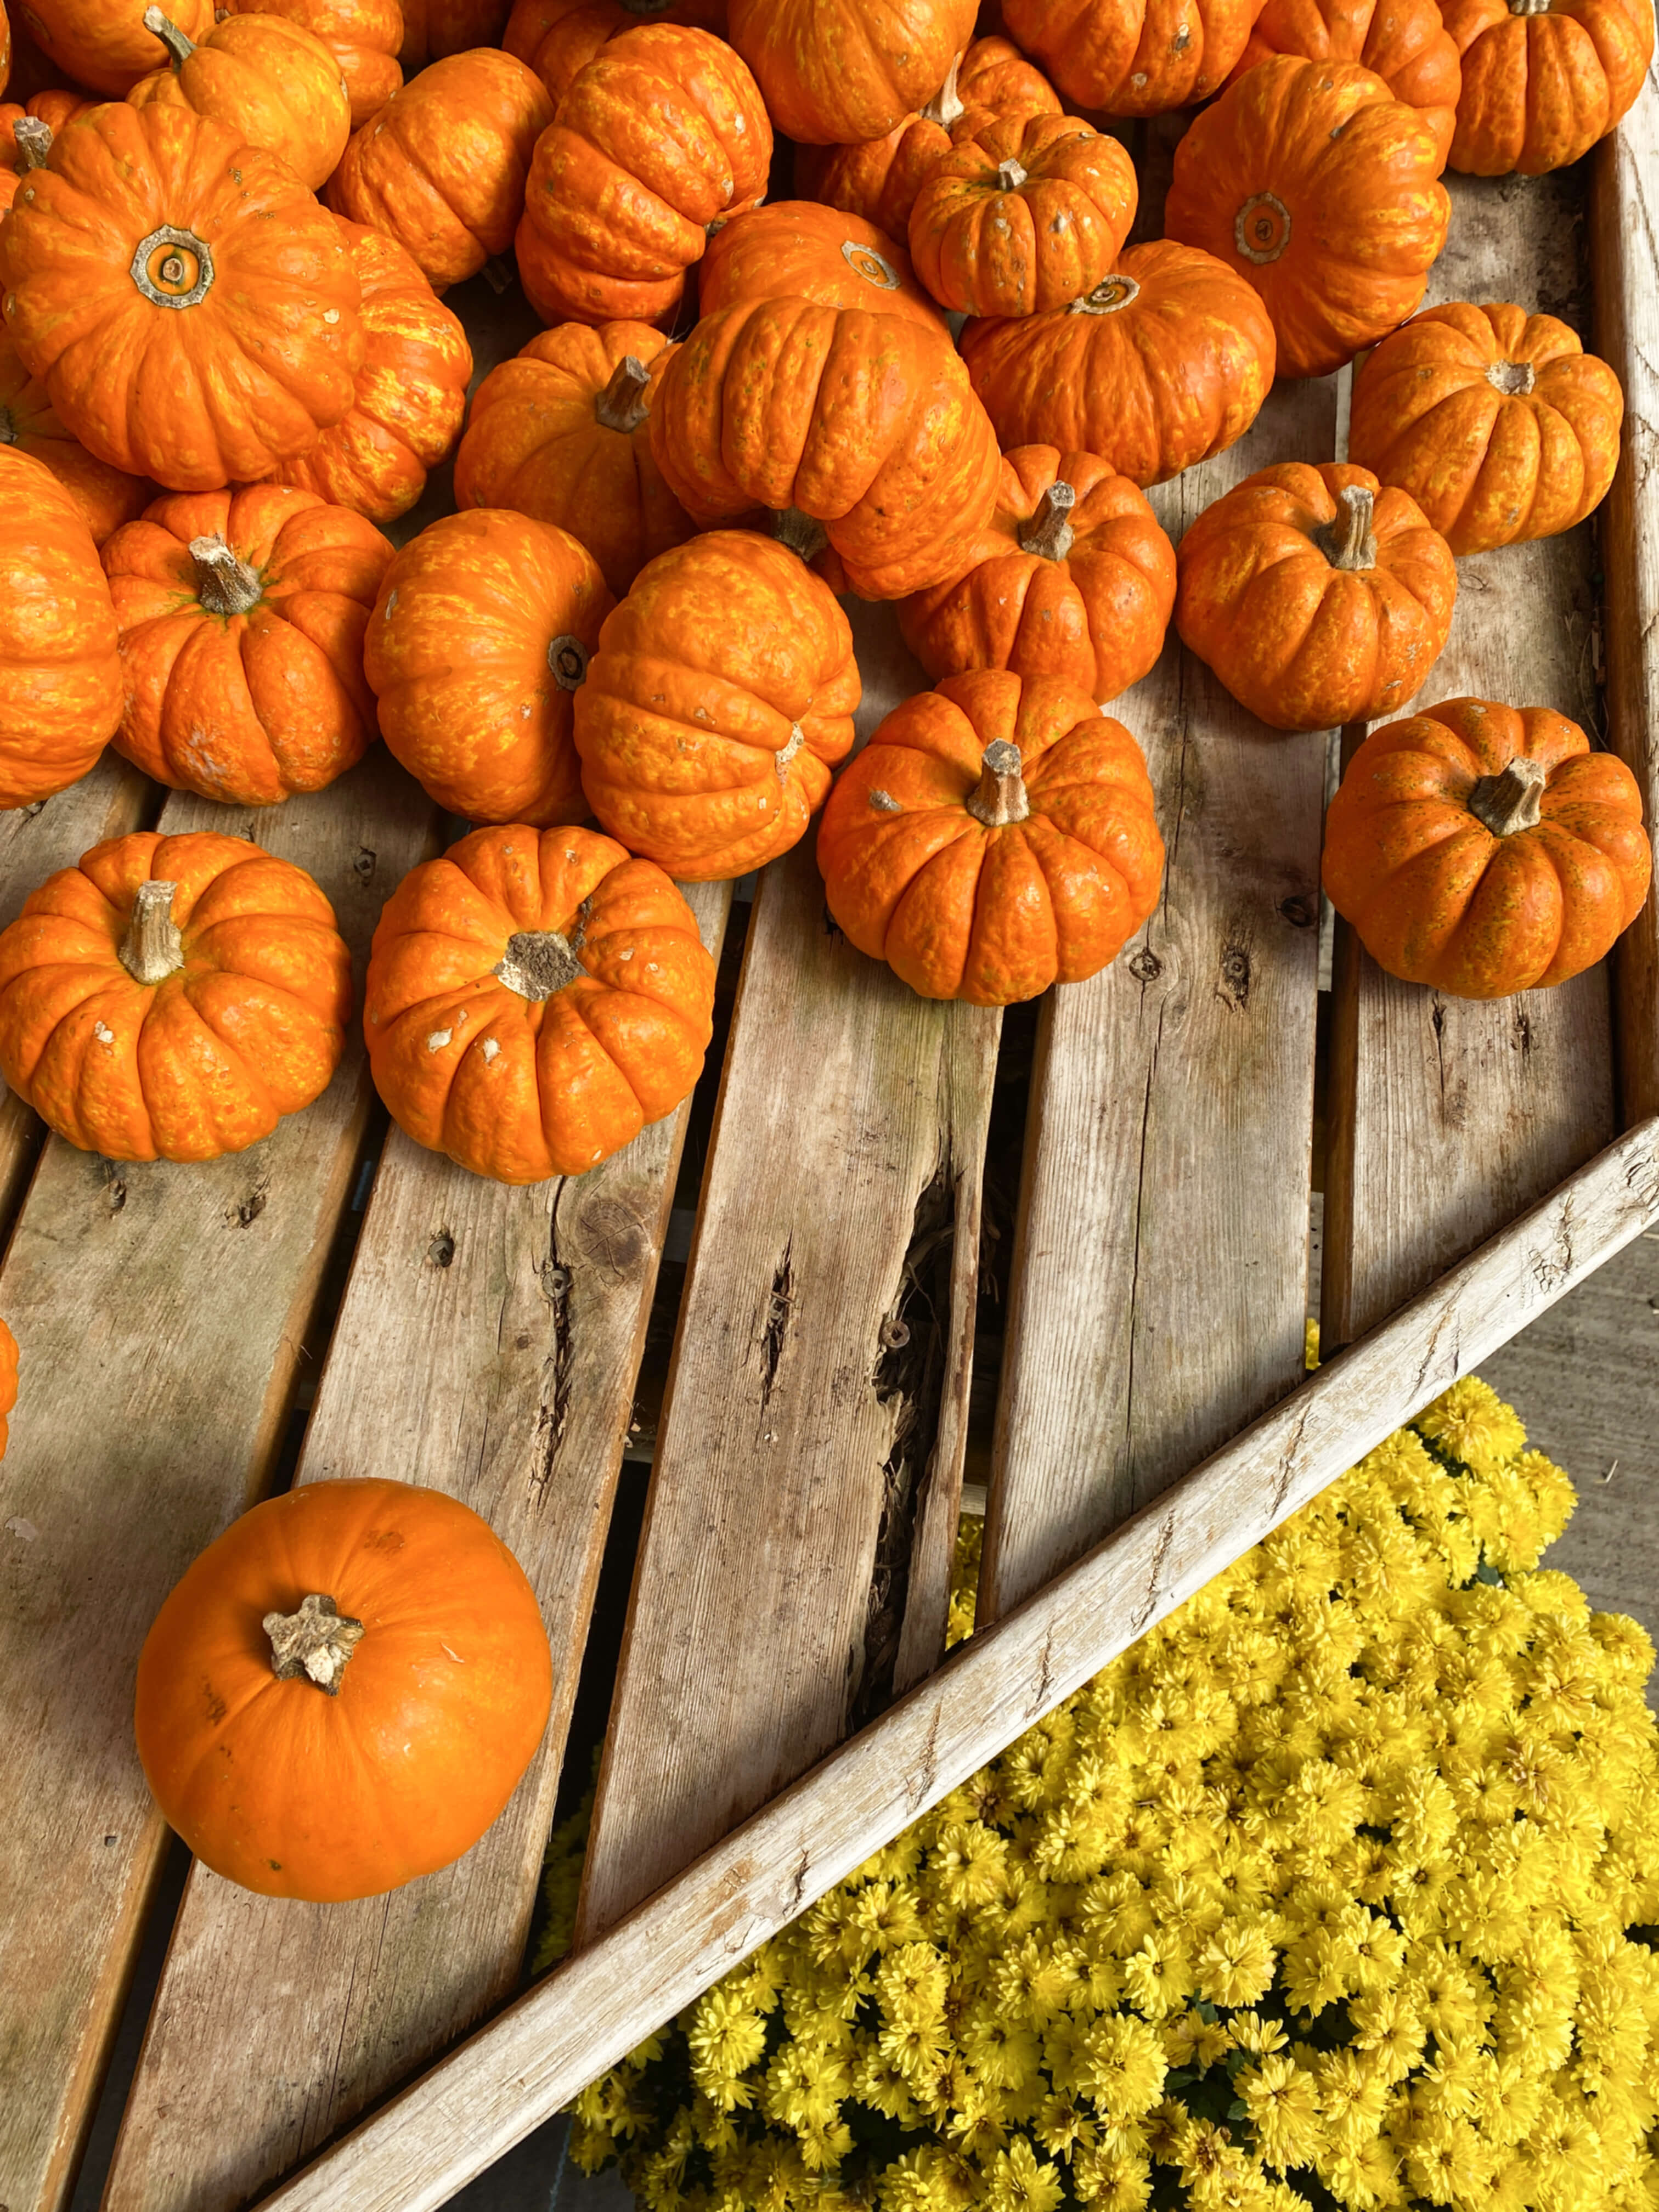
Full of autumn color and flavor from start to finish, the seasonal joy of this vintage meal starts with picking out your pumpkin. We are very lucky here in Connecticut to have this really gorgeous nursery just a few minutes from the house that has a dazzling display of just about every plant and homegrown pumpkin you could ever want in a New England garden. Right now there are mums for miles…

And rows of squash and gourds and pumpkins in all different shapes and shades…

So many beautiful pumpkins to choose from!

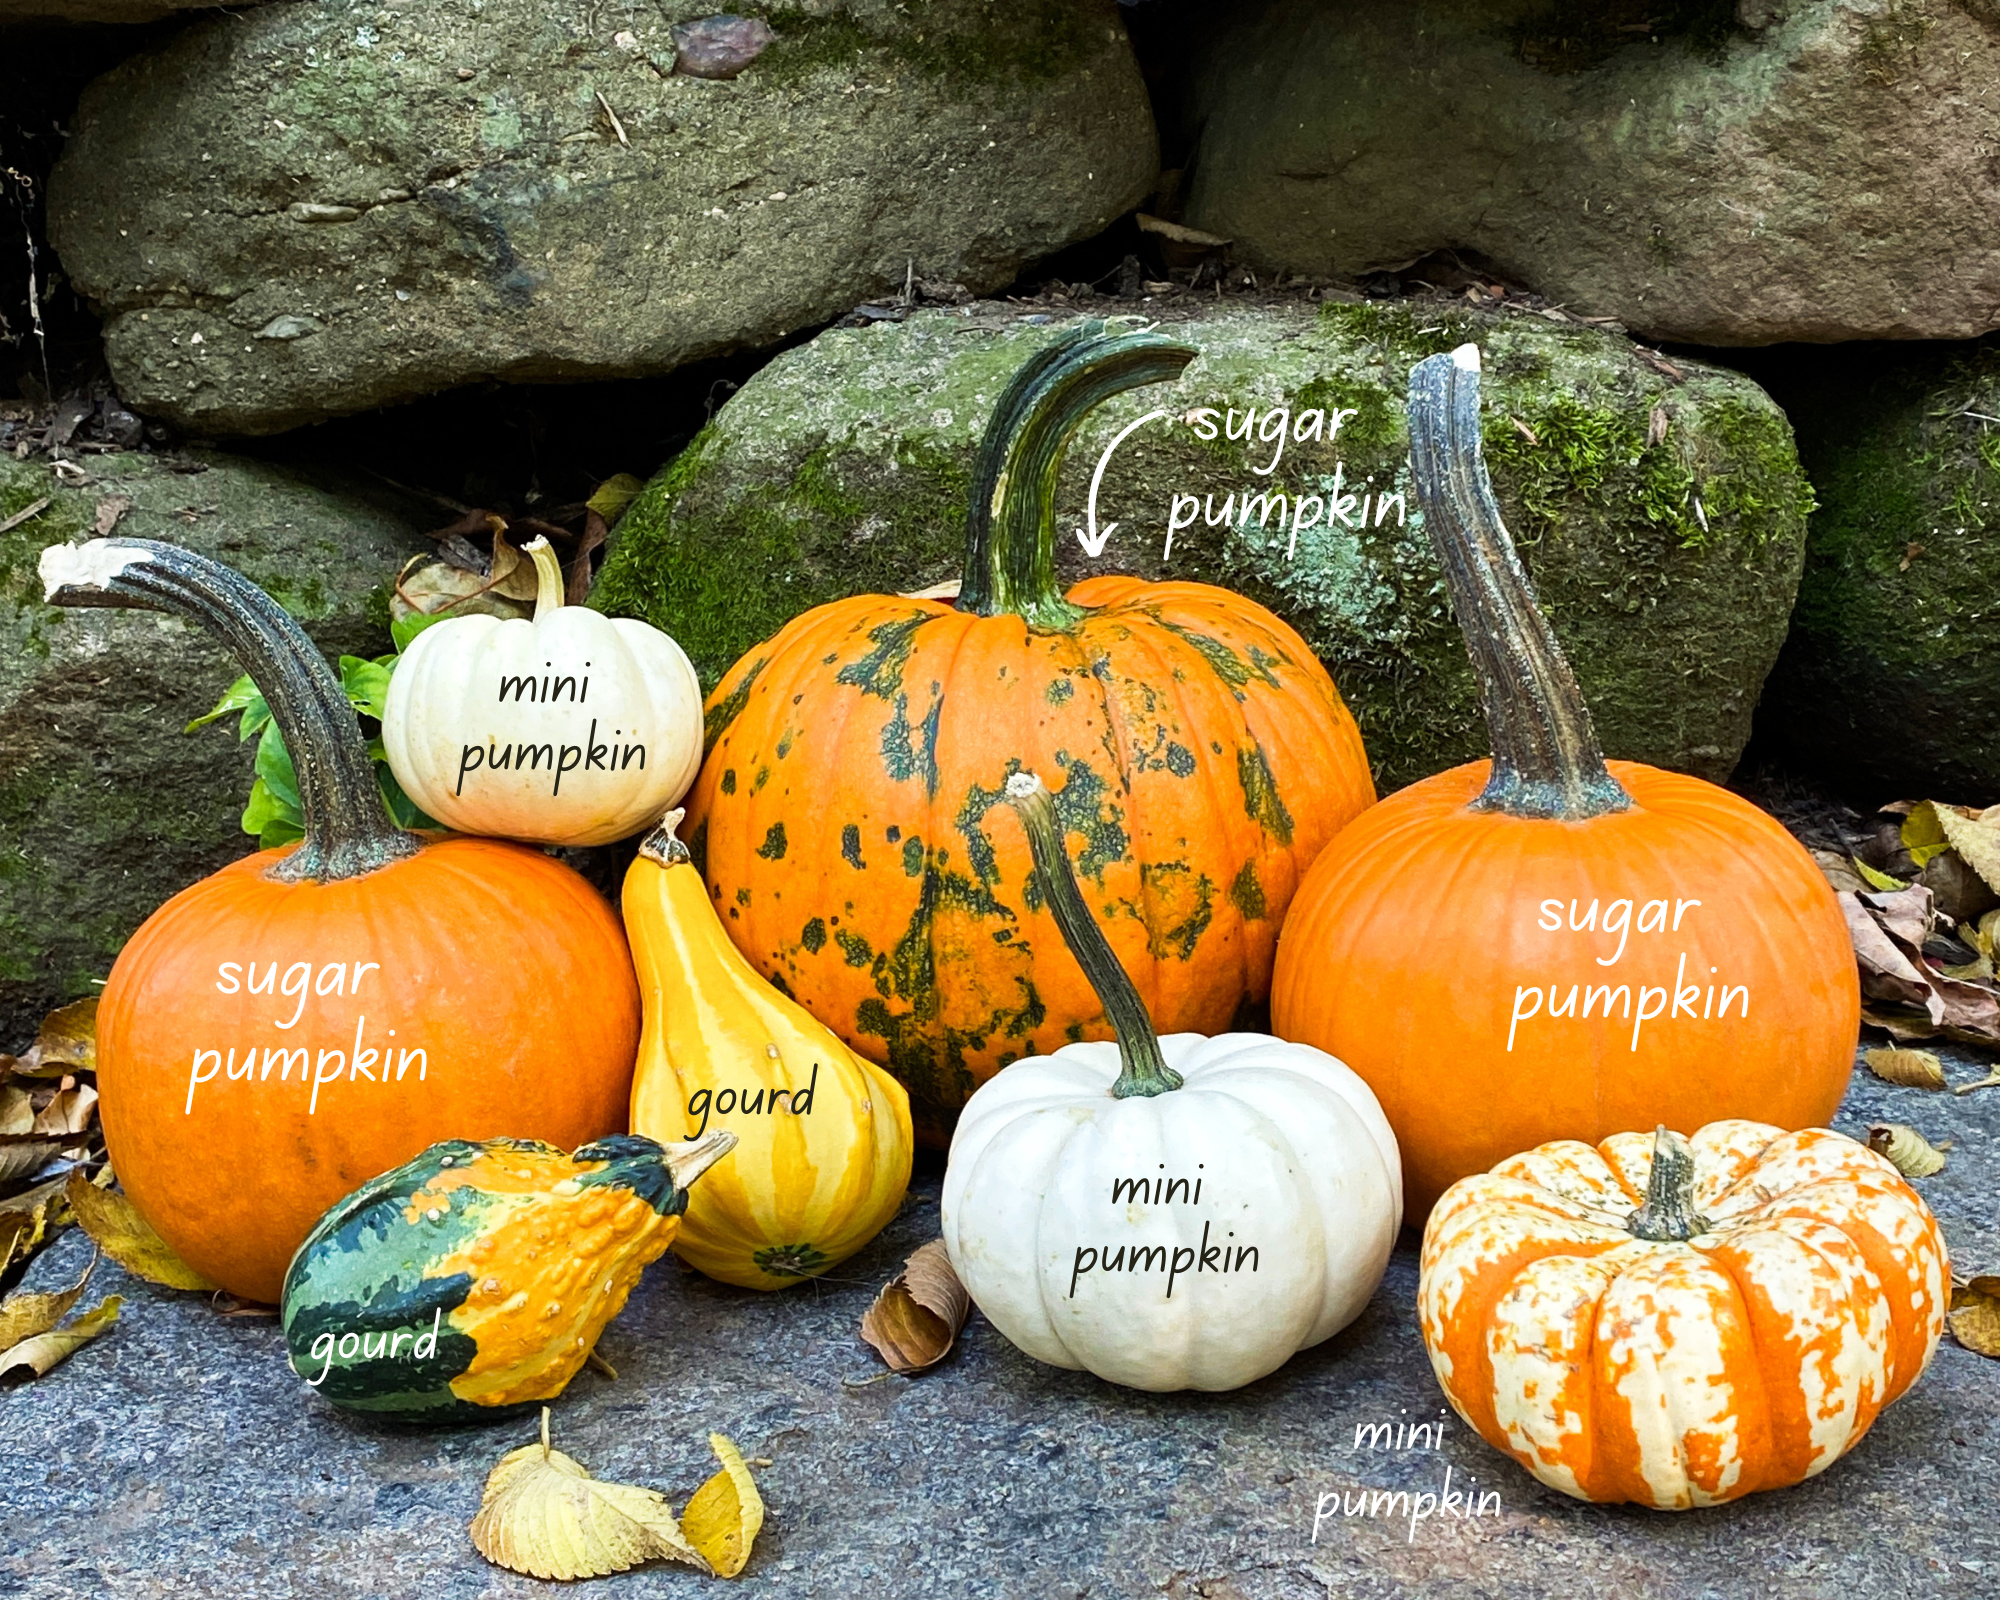
Since Julia didn’t specify what type of pumpkin to use, we had our choice of over a dozen varieties to pick from at the nursery. While all pumpkins are edible, even the little minis, for this recipe, we chose the sugar variety which is the preferred pumpkin for baking.

Sugar pumpkins!

Also known as pie pumpkins, they come in smaller sizes – an ideal factor for this recipe since we had to make sure it would fit on the grill. When you are selecting your pumpkins, look for ones that are of equal size and shape and that sit flat and balanced on the counter.

It is important to note that sugar pumpkins have thicker skin, and less stringy fibers, making them a good choice for roasting whole. A part of the American diet since the 1800s, they are ideally suited for baking and pie-making thanks to their slightly sweeter flesh. Larger carving pumpkins, on the other hand, have thinner skin, which makes them best for Halloween carvings but less stable in the oven or on the grill due to their more fragile composition. Instead of one 7-pound pumpkin that would serve 8-10 people as Julia recommended, we picked two 2 lb. sugar pumpkins that would serve two to four people and then cut Julia’s recipe in half.

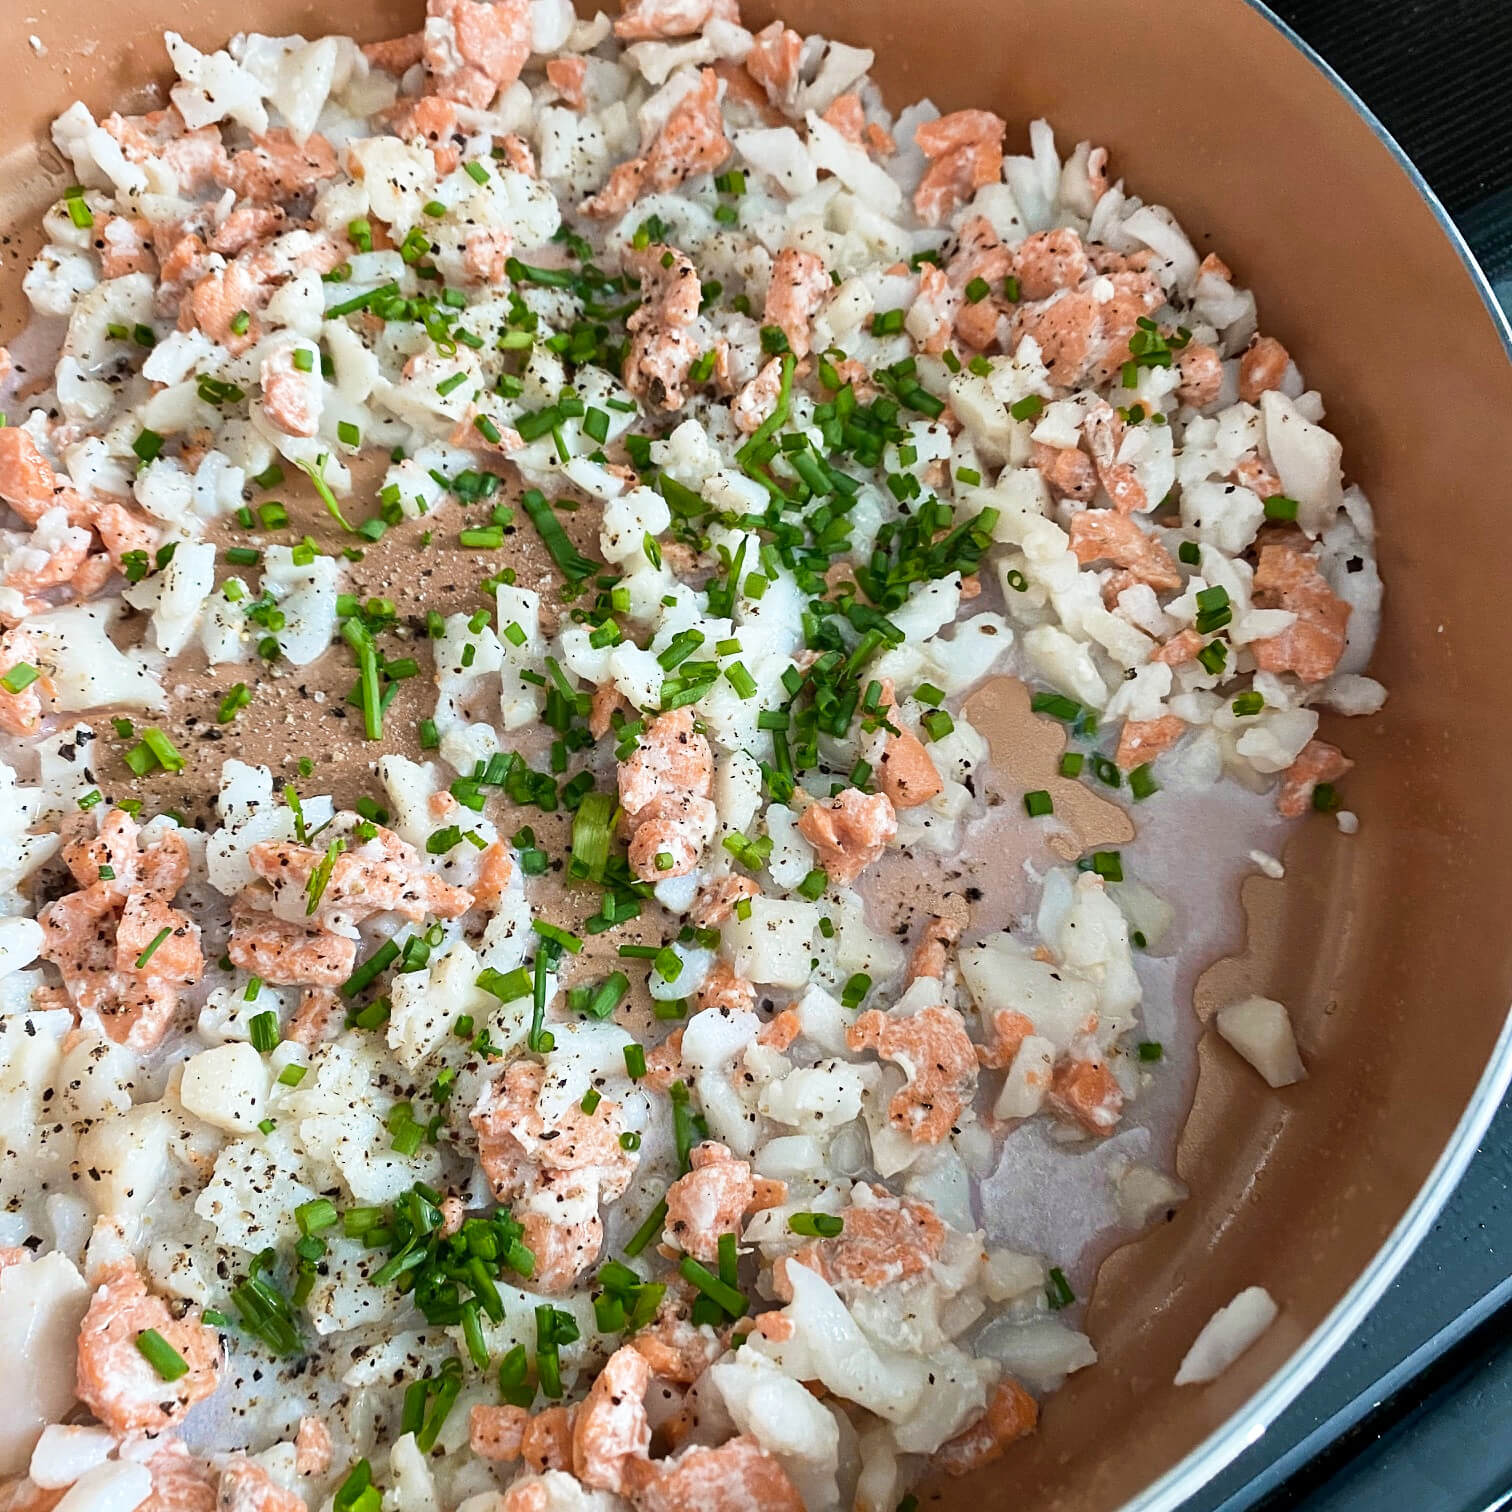
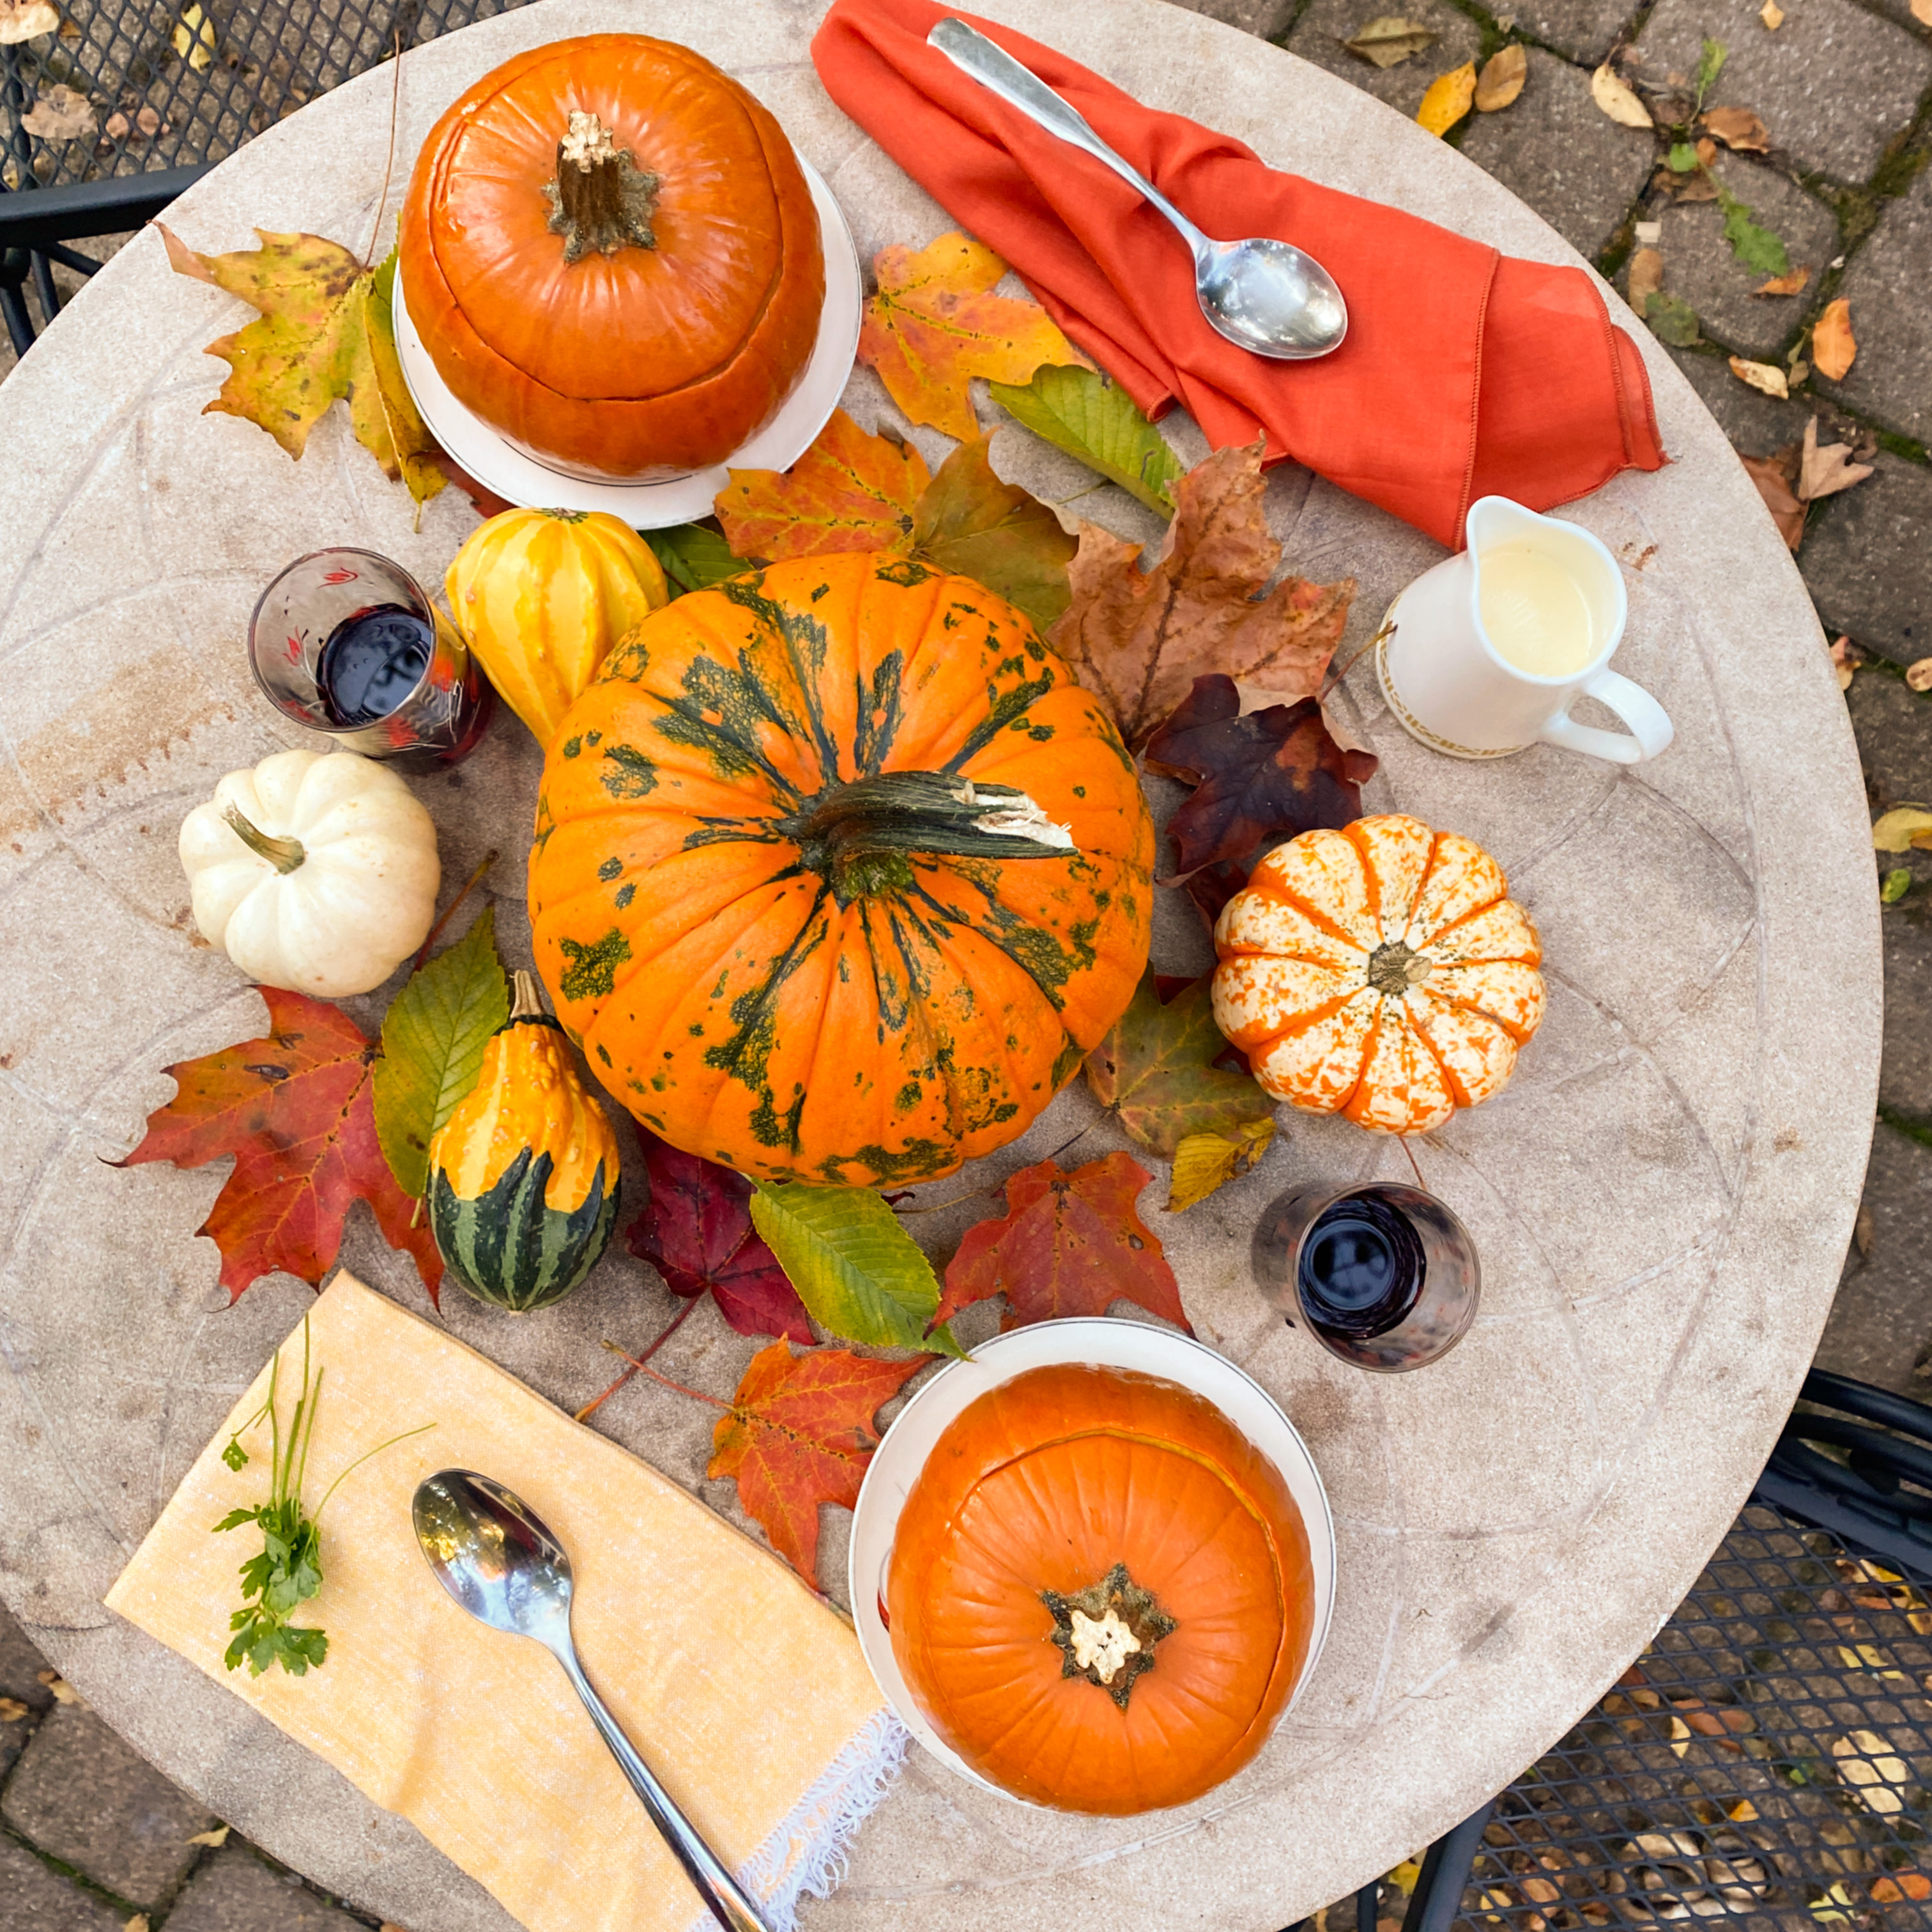
When Julia was preparing The Way To Cook, she was living in Cambridge, Massachusetts. She noted that this recipe was a delightful start to any fall dinner but also that it held its weight as a main course. “A real rib sticker,” she called it. I couldn’t agree more. It’s a meal just calling out for cold, blustery days and hearty appetites. Filling and full of flavor, while it is cooked in a pumpkin, this is not a typical pumpkin soup that has been pureed in a pot and accented with aromatic seasonal spices. This soup is chunky and layered. More like onion meets squash, it’s a veritable hot pot that contains all the delicate, deconstructed elements of French Onion soup with bites of pumpkin that you scrape from the inner walls while you eat. Swiss cheese and heavy cream add a bit of rich flavor. Toasted bread crumbs, garden herbs, and chicken broth add depth, and the pumpkin itself adds color and dimension when presented at table.

I love the fact that the pumpkin is an individual-sized serving bowl and that it really keeps the soup hot and insulated for quite a length of time. Since it cooks on the grill in a simmering bath of butter, broth, and the onion, cheese and herb mixture, the pumpkin soaks up all the savory flavor components making it taste bright and vibrant, instead of what sometimes can be a bland vegetable when eaten on its own. Grilling the soup outdoors made for a real sensory experience between the cool weather, the falling leaves, and the excitement of trying something new.

The recipe below is adapted for the grill but continue reading all the way to the end and you’ll also learn how to easily return the recipe to Julia’s original design.

Soup In A Pumpkin On A Grill

Serves 2-4

1 1/4 cups fresh country-style white bread, cubed for crouton-style bread crumbs

1 cup sweet Vidalia onion, minced

2 oz. butter (1/2 stick) plus 1 tbsp soft butter

2 two-pound sugar pumpkins

3/4 cup coarsely grated Swiss Cheese

2 cups chicken stock

Salt

Freshly ground pepper

8-10 fresh sage leaves, finely chopped

1/2 cup heavy cream

1/4 cup fresh parsley for garnish

Heat the grill to 400 degrees. Preheat a medium cast iron pan. Cut the bread into crouton-style cubes, about 1/2 inch in size. Spread crumbs in one single layer in the pan and toast for two minutes with the grill lid open. Remove from heat and set crumbs to cool in a single layer on a plate. Cover the grill to keep warm and maintain the 400-degree internal temperature.

Toasted bread crumbs.

In a pan on the stovetop (or in our case an electric hot plate!), melt the 1/2 stick of butter. Add the minced onion and cook over medium-low heat until the onions are translucent and tender (about 15 minutes). Add the toasted bread crumbs to the onion mixture, toss them completely, and cook for an additional three minutes. Remove from heat.

Rinse the outside of your pumpkins with warm water to remove dirt and dust and towel dry. Cut a lid out of the top of each pumpkin in the same way you would carve a hat for a jack-o-lantern. Remove all the seeds from the interior of each pumpkin and scrape the inner walls to remove the pumpkin strings. Rub the interior of each pumpkin with the remaining tablespoon of butter. Place the prepared pumpkins on a large flat cast iron pan or tray.

Add the onion/breadcrumb mixture to the inside of each pumpkin, making sure the mixture is evenly distributed between the pumpkins. Repeat with the grated cheese.

In a separate pan, bring the chicken broth to a boil. Once it is hot remove from heat and fill each pumpkin cavity with the broth. Make sure to leave at least two inches of space from the broth line to the top rim of the pumpkin so that the soup does not boil over onto the grill while cooking. Season each pumpkin with salt, pepper, and sage. I used about 1/2 teaspoon of freshly ground sea salt and about 1/4 teaspoon of freshly ground pepper per pumpkin. Depending on your taste and the saltiness of your broth you may want to add more or less according to your preference. Place the pumpkin top lids back on the pumpkins.

Making sure the grill is still holding an even 400-degree internal temperature, elevate the cooking pan or tray holding the pumpkins so that it is not sitting directly on the grill rack. We did this using a brick wrapped in tin foil and then placing the pumpkin pan on top of that, but whatever system you can manage to achieve indirect heat for the pumpkin pan is fine just as long as the pumpkin pan is not sitting directly on the grill rack.

Cover the grill and cook the pumpkins for 30 minutes. It is important not to overcook the pumpkins or you will wind up with weak bottoms and your soup might fall out like Julia’s did all over the floor. At the 30-minute mark, check the pumpkins to see if the outer skin has softened to the touch. Instinct will definitely guide you here. When you press the outer skin you want it to give but not collapse. You are looking for a similar firmness to a semi-deflated basketball or a just-about-ripe avocado. If the pumpkins are not quite soft enough, lower the grill lid and keep checking them every five minutes. As a reference guide, one of our pumpkins wound up taking 35 minutes to cook and the other 40 minutes.

When they are ready, remove the pumpkins from the heat to small plates (bread and butter size) and serve immediately. If one of your pumpkins is ready before the other, you can remove it from the grill to a plate and cover it in tin foil until the other pumpkin is ready. But do not let the pumpkins sit on their own for an extended amount of time before serving. As they cool, the pumpkins will eventually start to sink into the plate. Rest assured though, there is plenty of time to enjoy your soup before the pumpkin begins slumping so if you are worried about table presentation, don’t fret, you should be able to get through all of your meal before the pumpkins start to droop.

Cheesy, warm, and brothy, all you need is a soup spoon in the flatware department for this meal. The inner walls of the pumpkins will be soft enough to scrape with just the edge of the spoon. No forks or knives required for this dish!

Since presentation is a big part of the fun of this recipe, it is best enjoyed on the day of, hot off the grill. If you have leftovers, the soup is still delicious the next day but the breadcrumbs will continue to soak up the broth, so you will need to add more broth and a dash of cream if you choose to reheat it. Also, the pumpkin bowl will not keep its shape well overnight, so it is recommended to scoop out any leftovers, discard the pumpkins and store the soup in a separate container in the fridge.

If you choose to make this recipe using Julia Child’s oven method. Follow the instructions exactly but set your oven to 350 degrees to toast the bread crumbs and then to 400 degrees to roast the pumpkins. And if you choose to use one big pumpkin like Julia’s below, then double the number of ingredients for a 6-7 lb pumpkin which will serve 8-10 people.

Julia Child’s Soup in a Pumpkin utilizing one 8lb pumpkin circa 1989. Photo courtesy of her book,The Way to Cook.

Either way you cook it… oven vs grill… big pumpkin vs. small pumpkins… I hope you love this recipe just as much as we did. As we enjoy the autumn weather, this pumpkin soup is lovely outdoor party food and also tailgate fare for all you sports enthusiasts who like to gather around a grill while cheering on your team. Celebrate beforehand with an autumn-themed cocktail or serve a glass of wine with your soup and you’ll be warm and full of autumn joy by meal’s end. This soup pairs especially well with red or white wine. I recommend Cabernet Sauvignon or Chardonnay depending on your preference. Add some fall leaves to your table for decoration and you’ll have an easily put-together autumnal feast accented by Mother Nature. Come winter, this soup will fuel you through the holidays and snow shoveling season with aplomb. It might even inspire you to plant a few pumpkin seeds next spring, so that you can continue this creative cooking endeavor year-round and grow your own serving bowls for next fall.

Cheers to a happy Autumn and to loveable Julia who always paves the way to wonderfully delicious dining experiences.

Autumn has officially arrived in our neighborhood! Keep up with us on Instagram to see how the sugar maples are changing day by day in the yard of 1750 House.

Advertisement

Five Recipes That Celebrate Ireland Throughout Your Springtime Cooking


A cramped pub. Green beer. A parade. A contest for the best-dressed leprechaun. A rousing time. A silly hat. A limerick, a shanty song, a poem about lads and lassies. A wistful ballad sung soft and sweet. In America, that’s a pretty traditional take on St. Patrick’s Day in pre-Covid years, back when camaraderie and celebration could and would run rampant.

This year there will be no raucous clinking of glasses with strangers, no sweaty rock bands stomping out the pace of their songs, or tables stuffed so close together that the entire room sways like one big sea of elbows and shoulders and breath and beer. But there’s more than one way to celebrate the holiday, pandemic or otherwise.

As the only cultural heritage day that has been universally acknowledged and accepted throughout the world, this love of Irish heritage celebrated every March 17th, has meant different things to different people in different parts of the globe throughout time.

In St Augustine, FL  in the year 1600, St Patrick (then known to Spanish Floridians as St. Patricio)  was celebrated with a gunpowder salute and a day of feasting to honor their belief that St. Patrick was protecting the city’s cornfields.  In Boston in 1773, St Patrick’s Day meant a quiet dinner party among a few of the city’s prominent businessmen who celebrated not the love of a country but the love of British-born St. Patrick and his contributions to the Catholic faith in Ireland.

In Ireland at the start of the last century, the national holiday was a day meant for quiet reflection spent in church.  For many local, national and international businesses throughout the 1900s and 2000s, the holiday meant and still means a massive marketing campaign that floods the retail world with all things green, lucky and legend-loving. 

Here in the Vintage Kitchen, the holiday means the kick-off to springtime cooking. In our Southern neck of the woods, mid-March welcomes strawberry season, onion season, and early leafy green season. The first signs of flowers start dotting the landscape with dancing daffodils and jonquils. The color green in an array of tender shades burst out into the world – on tree tips, on blades of grass, in fresh produce newly arrived at the farmers market.  This time of year is when our climate most resembles Ireland’s weather – cool, rainy, sometimes sunny, oftentimes cloudy. It’s the exact weather I remember from my first trip to Ireland many years ago.  March marks the month I want to celebrate the country most.

In today’s holiday post, we are featuring five unique recipes from the Emerald Isle that herald the arrival of spring and that will keep you fed, Irish style, from morning til night. Included here are foods fresh from the fields, the streams, and the sea. They are untraditional takes on traditional food gathered from Ireland’s history that I hope will help will inspire your March menus like they always do mine. There’s a stovetop jam you can make in minutes, a soup that spotlights one of the oldest green vegetables in the world, and a seafood dinner that will have you rethinking your love of pork in exchange for this new fare. However you choose to celebrate the day – whether rowdy and pub bound, quiet and thoughtful or fully outfitted in space and spirit with decorations that delight, I hope these Irish themed foods will tempt you into creating some new traditions in your kitchen not just today but for the whole new Spring season ahead as well.

Currant Scones with Strawberry Preserves

There is long-standing uncertainty in the baking world when it comes to England, Scotland, and Ireland. It seems no one can quite determine which country invented the scone first. Lucky for us, all three countries make wonderful versions. This recipe for currant scones is made even better with the inclusion of Irish butter and fresh strawberry preserves made on the stovetop from one carton of fresh berries. Since we are now entering strawberry season, this is the perfect time of year to make your own homemade jam with fruit at its most flavorful stage. If you are like me, and somewhat intimated by the home-canning process, and making your own jams and jellies seems daunting, this strawberry preserve recipe is the next best thing. Made in minutes from one carton of fresh berries and some added sugar, it is simple, quick to prepare, and gives any store-bought jam a serious run for its money. Not as shelf-stable as jarred jams and jellies, this version only lasts for about 7 days in the fridge but heaped on top of a warm scone it’s so good, you probably won’t even have it around that long. Pick the ripest, reddest, more fragrant strawberries you can find for this recipe and you can’t go wong. 

Currant Scones with Strawberry Preserves

Makes 10-12 scones

1 cup wheat bran

2 cups unbleached bread flour

1 teaspoon baking soda 

3 tablespoons sugar

1/2 teaspoon salt

1/3 cup cold Irish butter, cut ino pieces

1/3 cup dried currants

1 cup buttermilk

1 egg, beaten

Preheat the oven to 425 degrees. In a large bowl, stir the bran, flour baking soda, sugar, and salt until well blended. Using a fork mash up the butter in the flour mixture until the it resembles coarse crumbs. Mix in the currants, then quickly stir in the buttermilk and egg to form a soft dough. 

Turn the dough out onto a lighlty floured work surface and pat it to 3/4 inch thickness. Use a glass or biscuit cutter that is 2″ inches in diameter, cut dough into rounds and place on a cookie sheet.  Bake for 15 to 20 minutes or until golden brown. 

Strawberry Preserves 

Makes 1 1/2 cups

1 basket fresh strawberries

3/4 cup cane sugar

Rinse strawberries and remove green tops. Place berries in a medium saucepan and mash them coarsely (either using a potato masher or your hands). Cook the strawberries over medium heat, stirring frequently, until they begin to thicken (about 10 minutes).

Reduce the heat to low, add the suagr and stir until it dissolves. Increase heat to medium and boil, stirring frequently for 20 minutes or until the mixture thickens to thick jam-like consistency. Remove from heat and let cool. Store in an air-tight container in the fridge for up to one week. 

Watercress and Lime Soup

Next up on the menu is Watercress and Lime Soup. Packed with nutrients, watercress is one of the oldest and healthiest leafy greens on earth dating all the way back to ancient times. Containing Calcium, Copper, Iron, Magnesium, Manganese, Niacin, Pantothenic Acid, Phosphorus, Potassium, Riboflavin, Selenium, Thiamin, Vitamin A, Vitamin B6, Vitamin C, Vitamin D, Vitamin E, Vitamin K and Zinc, it grows wild in clear, slow-moving streams all over Ireland.

Often used in Irish cooking like spinach,  it appears in all sorts of hot and cold dishes as well as fresh salads, and on sandwiches. Watercress Soup is a traditional heritage food that usually involves potatoes, but this recipe, adapted from the kitchen of Adare Manor in County Limerick changes things up a bit by adding lime juice and removing the potatoes. 

Adare Manor is a 13th century Tudor Revival-style castle that has a long and storied history of family ownership. Now it serves as a luxury hotel and golf resort.

The result is a creamy soup with a lot of depth, thanks to the peppery watercress and the tangy lime juice. Like the optimal seasonal timing of the strawberry preserves, this is a lovely springtime soup that blends flavorful watercress with cream and butter. Thin but nourishing, it is ideal fare for the rainy weather March and April often bring and shows off the bright bouquet of spring onion sets that are now coming into season.

Watercress & Lime Soup

Serves 6

2 tablespoons olive oil

1 onion, chopped

1 leek, white part only, chopped

3 celery stalks, chopped

1/2 cup diced celery root (if you can’t find celery root substitute 1 small white potato (peeled) and chopped and one extra stalk of celery, chopped)

6 cups vegetable broth

2 lbs. watercress

1 cup heavy whipping cream

Juice of 4 fresh limes

Salt & Pepper to taste

Freshly shaved parmesan cheese to taste 

In a large soup pot over medium-low, heat the oil and saute the onion, leek, celery and celery root (or potato/celery stalk substitute)  until tender but not browned, about 12 minutes. Stir in the vegetable broth and simmer for 30 minutes, stirring occasionally.

Add the watercress, raise the heat to high ad bring to a boil. Remove from heat and puree. 

In a deep bowl, whip the cream until soft peak form. Add the lime juice to the soup puree and mix thoroughly. Then gently fold in the whipped cream until well blended. Season with salt and pepper. Serve in bowls with shaved parmesan cheese and a sprig of watercress for garnish. 

This recipe, like most soups gets better the longer it sits. The lime retains its flavor and helps keep the color of the soup bright and green even after a few days in the fridge. For a heavier meal, a nice companion is a baked potato or a few slices of rustic country bread. 

Seafood Sausages with Chive Sauce 

The last two spotlights on Irish cooking for the springtime kitchen feature two recipes in one, although they can both operate independently as well. Fish based in one and sauce based in the other, both feature go-to ingrediants (seafood and chives) favored by Irish eaters all over the country.  Salmon and cod are the two most commonly enjoyed fish in Ireland. This recipe contains both, along with the addition of scallops, turning it into a trifecta of seafood-loving delight.

Originating from the kitchen of Caragh Lodge, an ideal nature lover’s getaway that has sat on the shores of Caragh Lake in County Kerry since 1875, the former house now turned hotel has been associated with good fishing and good cooking for more than a century.

The recipe, Seafood Sausages with Chive Sauce is similar to crab cakes but in a sausage shape. Protein-laden, it is an extravagant dish that you might reserve for special occasions or jubilant merrymaking holidays like today when you want to surprise your dinner mates with something out of the ordinary.  Rich, filling, and full of flavor, the sausages are fun to make, and they involve a unique technique. Like a fleet of canoes bobbing on the Irish Sea, the sausages are simmered in plastic wrap where they steam and plump their way into shape before being rolled in bread crumbs and sauteed in butter. Once plated, they are drizzled with more butter in the form of a silky chive sauce. The result is a totally decadent dining experience that sits on the same  level of other indulgent foods like lobster with drawn butter, Eggs Benedict, and Beef Wellington. Colorful and unique, this is a recipe that offers much in the way of interest and would be lovely for other spring-time holidays like Mother’s Day or Easter in addition to St. Pat’s.

Seafood Sausages with Chive Sauce

Serves 4-6

12 oz salmon

1 tablespoon butter

4 oz. cod filet, finely diced

4 oz. scallops, finely diced

1/4 teaspoon salt

1/4 teaspoon pepper

2 teaspoons fresh chives, minced

2 egg whites 

1/2 cup heavy whipping cream

1 cup fine fresh bread crumbs

2 tablespoons butter

Finely dice 4 oz. of the salmon. In a large saute pan or skillet,melt the unsalted butter over medium heat and saute the cod, diced salmon, and scallops for 5 minutes or until opaque. Remove from heat and season with salt, pepper, and chives. Set aside.

In a blender or food processor, puree the remaining 8 oz of uncooked salmon. Add the egg whites, salt, and pepper and process until smooth. Place the pureed fish mixture in a bowl set inside a bowl of ice and slowly whisk in the cream.

Add the sauteed fish and mix to combine. Refrigerate mixture for one hour. 

Remove fish mixture from fridge. Place one soup spoon size dollop of fish mixture onto a piece of plastic wrap and shape into a sausage.

Roll it up and tie a knot at each end with kitchen string. Repeat with the rest of the mixture.

Bring a large pot of water to a simmer and poach the sausages for 10-20 minutes depending on size and thickness.

When the sausages are done look for the plastic wrap to take on an air bubble shape. The sausages should be plumped up like hotdogs get when boiled in water, and the sausages should be firm to the touch. (The firmer the sausages are the easier they will be to roll in the bread crumbs and saute in the pan without breaking apart). While the sausages are cooling make the Chive Sauce.

Once the sausages have fully cooked in the water remove them to a baking rack and let them cool completely (about 30 minutes).

Roll the sausages in bread crumbs. Melt the butter in a large saute pan over medium heat and fry them until golden brown on each side.

Chive Sauce

3 tablespoons dry white wine

3 tablespoons white wine vinegar

1 tablespoon minced shallots

One pinch of pepper

1 tablespoon heavy whipping cream

3/4 cup butter, cut into pieces

1 tablespoon fresh chives, minced

In a small saucepan combine the wine, vinegar, shallots, and pepper and bring to a boil over high heat. Boil until the liquid reduces to about 1/2 tablespoon. Add the cream and boil again until it begins to thicken. Whisk in the butter, a few pieces at a time keeping the sauce just warm enough to absorb the butter as you whisk. Add the chives. (If your sausages are not ready to serve at this point keep the sauce on low heat and stir occasionally until the sausages are cooked. Drizzle the sauce over the sausages and serve. 

As mentioned earlier, both the sausages and the sauce are lovely together but also lend themselves to enjoyment with other foods. The chive sauce would be delicious drizzled over baked potatoes, eggs or tossed with pasta. The seafood sausages would be wonderful crumbled on top of a salad, stuffed inside a summer tomato or spread out on toast points. Kitchen creativity rules the day when it comes to these two recipes, including experimenting with different blends of fish for the sausage and different types of herbs for the sauce.   

The thing I love about Irish cooking most, is the country’s ability to blend fresh ingredients with comfort foods. Cream and cheese and butter are rife in so many recipes but when balanced with fresh vegetables they don’t feel overwhelming in the gastronomy department. And I love how there’s a little bit of everything for everyone in Ireland – whether you prefer humble provincial food or fancy fare, there’s something to please every palate.

If you are interested in learning about more Irish recipes, some favorites we’ve highlghted previously here on the blog include… a recipe from Katharine Hepburn’s Irish cook, how corned beef brisket came to America, and a recipe for a Guinness-infused Irish cocktail.  

Cheers to Ireland and to Spring and to new foods and flavors on this happy St Patrick’s Day! Hope your day (and your season!) are the most delicious one yet! 

Photo Credits: Ross Sneddon, Father Ted


A Case Study of 1950’s Food Photography: Then and Now


There’s a topic of conversation that continuously cycles its way around the Vintage Kitchen. It involves disconcerting colors, one-dimensional shapes, and awkward arrangements. It combines presentation and food props and fussy table settings.  And it is the ultimate make-or-break factor in the exploration of a recipe or the selection of a cookbook.

In today’s post, we are diving into the world of 1950s food photography to figure why exactly that decade’s imagery has not translated well to our modern day sense of food aesthetic. Was the camera equipment to blame? Or the food styling? Or an outdated sense of table display? Not necessarily. Through the dissection of one color photograph on the cover of a cookbook published in 1950 and a little research into the field of vintage photography, we discovered one simple reason why food photos of the 50’s lack the luster to ignite our appetites today.

This is the photograph that spawned the conversation…

With it’s floating concoction of grey meat, beige celery, yellow corn (which actually turned out to be barley), cubed potatoes and a shapeless, unidentifiable rust-colored vegetable (are they carrots? or red peppers? or tomatoes?) this poor soup, the cover star of the cookbook, didn’t have much going for it in the boy-this-looks-delicious-department.

Published in 1950 by the Culinary Arts Institute, an organization devoted entirely to the science of better cookery, the 250 Delicious Soup Recipes Cookbook was edited by Ruth Berolzheimer, a woman who spent the majority of her life writing about food and experimenting with flavors and ingredients.  The recipe featured on the cover was a classic crowd-pleaser perfect for the winter kitchen – Beef and Barley Vegetable Soup – which combined homemade broth, and a variety of vegetables and herbs.

Technically, our cover star soup had everything going for it – complimentary ingredients, expert cooking knowledge and a trusted company to back it up. So how is it that it wound up looking like something you would never want to voluntary make or eat? Is this really what an actual bowl of beef and barley soup looked like at the dinner table in 1950? Further investigation was needed.

We began first with the physical appearance of the photograph, thinking that maybe it was the camera that yielded an unappealing portrait. Afterall, cameras weren’t as sophisticated back then as they are today, and photo editing software didn’t exist and the ability to capture compelling, exacting details in a crisp, clear way was much harder than it is now.  But then we remembered about the food photography of Edward Weston, who took pictures like this in the 1930’s…

Portrait of a Cabbage Leaf, 1931

and we realized that technical abilities of the vintage camera couldn’t be blamed. This cabbage photograph has plenty of compelling, exacting details and it was taken two decades before the beef and barley soup recipe ever came to fruition.

Next, we thought maybe it was the ingredients that doomed the soup’s ability to ever look pretty right from the very beginning.  So we prepared the same exact recipe with the beef and the barley and the rusty red vegetables (which turned out to be carrots and tomatoes). We added the celery, the potatoes, the onions and the fresh thyme and parsley the recipe called for.  It was all the same but it was different because our soup turned out looking this…

Not a grey lump in the batch and lots of color. The difference between the old photo and the new one instantly made us feel better for the soup eaters of 1950. Perhaps, they weren’t eating bland looking food after all.

So how could the same recipe look so different? How could one be grey and murky and the other be bright and vibrant? The answer is black and white, literally.

As it turns out 1950 was the decade when color photography was just beginning to become more affordable and more mainstream. Up until then, black and white film ruled the medium and photographers excelled at setting up shots that looked great in dramatic, colorless settings.  They relied on subjects and styles that would translate bold shapes and dramatic lighting and bring crisp clarity to their compositions in order to reproduce a striking image. This explains everything about our cookbook cover. When we changed the photograph from color to greyscale look how much more appealing the soup became…

Instead of focusing on the colors in the soup, you automatically focus more on the shapes floating in the broth and the overall symbiosis of the whole presentation. That means food stylists, or home economists as they were known up until the mid-1950’s, were used to thinking in the same black and white way as photographers when it came to styling food for the camera.

In the late 1940’s and early 1950’s, color was something new to learn about and adapt to. It was a baby in a glass shop, a wild dog on a leash, an uncharted course to explore. It was wild and exciting and sexy, but most people didn’t really know how to work with it right away in order to make incredible, indelible images. It required a creative and visual skill set much different from what was learned and achieved through black and white photography. It definitely took time to master.

The cover of this 1950 cookbook is a striking example of using an old mindset on a new medium. Photographers and stylists were used to their past ways of setting up shots for a black and white end result. They were relying on bold shapes, and dark contrasts to tell a black and white story in color.

In the same vein, the soup we made in the Vintage Kitchen doesn’t look nearly as appetizing in black and white as it does in color because our goal was always to reproduce an image in color. In the black and white example, our soup now looks murky and lacks depth and definition.

So this brings us to a fundamental point. Don’t judge a book by its cover or a recipe by its photo, especially when it comes to midcentury vintage cookbooks.  Food photography is an art form that grew into greatness over a long period of time but the recipes have always remained their humble selves.

Hopefully, if you are on the fence about old cookbooks this post will persuade you to give them another chance. The beef and barley vegetable soup may not have looked appetizing on the 1950 cover but it turned out to be delicious in our modern making of it, proving that looks can be deceiving even when it comes to cookbooks.

Cheers to kitchen surprises and food photographers!

Interested in more unexpected kitchen adventures? See what we learned when we explored the land of molded gelatin salads this past summer here.

Ready to experiment with some vintage recipes on your own? Find a bevy of vintage cookbooks in the shop here.

Anna Clellan and the Love Apple Soup circa 1928

Tomato Soup circa 1928

There has been a lot of talk about recipes here on the blog as of late but so many interesting food-related topics have been popping up recently in the historic land of Ms. Jeannie, it seems a shame not to share them. So here we are back in the vintage kitchen with a newly discovered almost 100 year old recipe that came from Ms. Jeannie’s great -great Aunt.   This week’s post takes us to the heartland of America – a middle state where young newlyweds ventured via covered wagon in the the 1860’s and set up life, spreading their roots so deep in the soil they practically built up the foundation of a small township.

Albert, Martha, their children and grandchildren
Albert and Martha (pictured on each side of the flower arrangement)  in Vinton, Iowa surrounded by their children and grandchildren.

We have talked about the Edwards’ family a few times previously on the blog so if you are a regular reader you’ll remember the adventurous Albert and his wife Martha who married in Johnson County, Indiana in 1865 and then immediately (the very next day in fact!) got into a covered wagon and headed west towards a new frontier. Three months later, Albert and Martha settled in Benton County, Iowa in a small town east of Cedar Rapids.

If you are familiar with Little House on the Prairie and are up on your John Travolta movies you’ll know Vinton, Iowa for two reasons. It is where Mary Ingalls  attended the Iowa School for the Blind (also known as the Iowa Braille and Sight Saving School) between 1881-1889 and it is where they filmed many scenes of the movie, Michael, (including the final courthouse scene) starring John Travolta, Andie MacDowell, William Hurt and Oliver Platt.

Vinton, Iowa is faomus for these faces and places.

Known primarily for its burgeoning agricultural opportunities in the mid-1800’s, Martha and Albert had two goals when they moved to Vinton – farming and family. In true pioneer spirit they  got down to business right away working out their farmplace and starting a family dynasty that would eventually produce 11 children and 45 grandchildren.  Their first baby, Anna was born during the crispy days of October 1866 just 19 months after their arrival in Iowa.

As the oldest of her 10 brothers and sisters, Anna learned a  lot about farm life, babies and family relationships. By the time she was 4 she saw the birth of two brothers  and then the sad death of one those brothers who was in her life for just 7 short months. The next five years brought three new sisters and then the death of her remaining brother Cornelius. So by the time Anna was nine years old she had already witnessed the death of two of her siblings.

When Anna turned 18 in 1885 and married Selmon T. Whipple she had six sisters in total ranging in age from 2-14. Immediately following their wedding Anna and Selmon set up their own farm in Benton County and got to work on their own family. At this point  in the late 1880’s and early 1890’s, babies were coming into the family from all directions.

Anna’s mom, Martha was still having her own kids and Anna was just starting to have hers, which means mom and daughter were preganant and giving birth at the same time.  So the the first few years of Anna’s marriage went something like this… a baby boy for Anna, and then a baby brother for Anna, a baby girl for Anna and then a baby sister for Anna. It’s a whirlwind of confusion and name sharing where all the aunts and uncles are close in infantile age to their nieces and nephews but brothers and sisters have almost two decades between them. And then add in the fact that Anna’s six sisters were starting to marry and have their own families and it was just kids everywhere.


Selmon and Anna's house in Vinton Iowa, built in 1906
Selmon and Anna’s house in Vinton, Iowa.

Basically for the first twenty years of Anna’s marriage she was pregnant and raising babies. Her fifth son Frankie died the day he was born but all the other little ones made it through to adulthood.  A year and a half  after her last baby, a little girl named Nellie, was born, Anna’s husband Selmon fell off a shed and became paralyzed.  For three long months he lay immobile at home before he died  leaving Anna, aged 45, the entire responsibility of managing the farm, twelve kids and her large house.

Death notice printed in the Vinton Eagle, 1912
Selmon’s death notice printed in the Vinton Eagle, 1912

But Anna was a strong woman and she came through this tragic circumstance with courage and a loving heart still intact. In addition to all this newly placed responsibility she even managed to take on the  care and raising of her infant grandson, whose mother (Anna’s daughter-in-law) died from tuberculosis.

As the wife of a farmer with over a hundred acres in crop production and the mother of thirteen children Anna knew her way around the vegetable garden and the kitchen. In 1928 she submitted a recipe to the Vinton Cook Book which was compiled by the First Division Pastor’s Aid Society of the Methodist Episcopal Church. With a little help from the ladies at the Vinton Historical Society, Ms. Jeannie was able to acquire a copy of the recipe that Anna submitted.

cookbook

cookbook2

cookbook3

The recipe is for tomato soup. It is a very simple one with few components but it does contain one unusual ingredient – baking soda. Today in the vintage kitchen we are recreating this 89 year old recipe to see what cooking in the 1920’s tastes like and to see if it still appeals to our modern palettes.

Tomato Soup circa 1928

Most likely Anna would have used previously canned summer tomatoes from her garden in this recipe or she would have made it fresh during the summer months and possibly canned the soup for winter consumption. Either way, it is February and Ms. Jeannie does not have any leftover summer tomatoes on hand nor does she have any fresh in the garden. So instead we are relying on fresh hot house tomatoes that were grown in Chile. Ms. Jeannie did not have high hopes for flavor with these guys even though they looked absolutely beautiful in the grocery store.

soup2

But she was very pleasantly surprised at both the sweetness and firm fleshiness of these traveling love apples. Anna served her soup topped with a sprinkle of crushed crackers, which most likely would have been soda crackers or saltines. But Ms. Jeannie wanted to pair her soup with something a little more exciting so she made rustic Caprese-style toast to partner. Look for that recipe following the soup. She also added 1/3 cup tomato paste at the end, which is not in Anna’s original recipe (as you’ll notice from the picture above) –  an explanation for that addition follows the final step. Other than that, the recipe was made as-is.

Anna’s Tomato Soup (circa 1928)

1 quart tomatoes (about 4 -5 cups)

1 pint milk (about 2 cups)

1 pint water (about 2 cups)

1/2 teaspoon baking soda

1 pint beef broth (about 2 cups)

2 tablespoons butter

1/3 cup tomato paste

4 crackers (optional- see second recipe)

Salt & pepper to taste

soup3

  1. Remove seeds from tomato (Note: there is no mention as to whether the skins of the tomato should be on or off – most likely they would be skinless, but Ms. Jeannie left them on and they rolled themselves into thin toothpicks which added a little bit of texture to the overall soup in the end. Next time she will try making it with the skins removed. So it is your preference on this aspect.)
  2. Add the tomatoes and water to a large pot over medium-high heat and bring to a boil.
  3. Add the baking soda and stir – like those lava volcanoes you used to make in third grade science class, this tomato /baking soda combo does foam up quite a bit, so keep stirring it until it comes to a boil. Then add the milk, butter and beef broth and bring to a boil again.

At this point, Anna mixed in some salt and pepper, called it done and ladled the soup into bowls, topping each with some crushed crackers. But the soup at this stage was very thin and tasted rather plain and uneventful so Ms. Jeannie added 1/3 cup tomato paste and let it simmer on low heat for about 20 minutes. By adding the paste it gave the soup a much more tomato-y flavor and thickened it up a bit. The purpose of adding the baking soda was to neutralize the acid in the tomatoes, which it did beautifully. By the time it was ready to serve this soup had a gorgeous, silky consistency, bright flavor and a rusty orange hue.

soup4

Garlic, Basil Cheese Toast (makes two slices of toast)

1 clove garlic, roughly chopped

6 fresh basil leaves, chopped

2 mini mozzarella balls, sliced thin

2 slices of multi-grain braed

2 teaspoons olive oil

dash of red pepper flakes

  1. Slice bread and smother each slice with one teaspoon of olive oil.  Add the cheese  in a polka dot style fashion and intersperse the garlic. Sprinkle the basil leaves, red pepper flakes and a dash of salt on top.
  2. Bake in a 400 degree oven for 8 minutes and then broil for  1-2 minutes until edges of crust start to brown slightly.

soup5

Back in the late 19th century and early 20th century farm meals were big because family members and workers needed sustenance to get them through their chores. Apple pie was often served at breakfast alongside eggs and bacon and fried chicken and casseroles and  fresh bread. Most likely this soup would have accompanied many other dishes on the table, which is why it is not made of heartier stock. In our modern world, this makes a lovely light lunch or quick snack if you are pressed for time. And like any good foundation recipe it can be augmented with lots of other elements including onions and fresh basil, garlic, sour cream, Parmesan cheese… you get the idea. It is quite lovely on its own but Anna wouldn’t mind at all if you wanted to add your own creativity to the mix.

After Anna’s husband died in 1912, she managed the farm for another 9 years growing corn and oats and reporting regularly in the newspaper as to their qualities and quantities. She raised her kids and grandkids and kept her house bustling with love and care. Eventually she said goodbye to farm life and moved into town to live with one of her daughters.  Active in various community organizations and  her local church  she was referred to as being noble, generous and kind. When she passed away in the 1940’s at the age of 81, she left behind a family dynasty that included 10 children, 31 grandchildren, 20 great-grandchildren and one great recipe.

Unfortunately this tiny photograph is the only identifiable image of Anna. Pictured on the far left, she is posing with her sisters in front her farmhouse when she was in her 70’s. Anna also appears in the family portrait at the top of this post but she is unidentifiable along with all the other women. One day soon hopefully we can place a name with a face!

Cheers to family cooks, the recipes they make and the love they pass on!

*** UPDATE 2/24/2017 *** One of our readers sent a question regarding measurements of pints and quarts and how many tomatoes actually made up one pint. Ms. Jeannie used all the vine-ripened tomatoes you see in the photos (12 in total) which were each roughly the size of a plum. If fresh tomatoes aren’t an option in your neck of the woods, substitute them with 4-5 cups of canned tomatoes (make sure the seeds have been removed).

Also to make things simpler, ingredients calling for pints and quarts have been measured out into cups as well (see ingredient list), since that is a more common unit of measurement in today’s world of cooking. These new updates will take out all the mathematical guess work making this recipe even easier and faster to make!


Thursday in the Kitchen: Creamy Potato Soup – A Recipe from Ireland

Spring is waking up slowly here in the South. The nights are still cold but the afternoons reach into the early ’60’s on most days now. This afternoon warming makes for delicious stolen moments around the 4:00pm hour when Ms. Jeannie likes to take a cup of coffee  outside with her and dream about all the potential and possibility for her garden plan this coming season.

In anticipation of all this gardening, Ms. Jeannie has been going through some of her favorite recipes so that she can figure out what she needs to grow so that she’ll have the freshest ingredients possible. One of her most favorite things to make is soup, so you’ll be sure there will be a variety of vegetables popping up!

In anticipation of such gardening delights and in anticipation of the upcoming Irish holiday, Ms. Jeannie cooked up one of her most favorite soups…potato!

Creamy Potato Soup
Creamy Potato Soup

This recipe came from her Irish Isles cookbook, which was a birthday gift this past summer from her dad.

Straight from Ireland - music and recipes!
Straight from Ireland – music and recipes! Photo courtesy of irishshop.com

Not only was it a gift of recipes – but it also came with a cd of classical Irish music, which made for a well-rounded cooking experience!

This was a very sentimental gift for Ms. Jeannie. Many years ago, she took a father daughter trip to Ireland and together, they explored the Southern countryside for 10 days. They stayed at 3 different hotels and visited about half a dozen cities and towns. There were sheep (so many!), crazy drivers, the perilous N7 , endless Frank Sinatra on the radio, fabulous museums, trips to the lace-makers, dinners in castles, driving tours of coastal fishing villages, a wet and wild tour of the Cliffs of Moher, lunches in pubs and a million miles of laughter in-between. It was a fantastic trip – one of Ms. Jeannie’s most favorite of all  her travel adventures.

This cookbook is a compilation of recipes from the country hotels and manor houses all over Ireland. There are even some recipes from the places where Ms. Jeannie and her dad stayed!

The Leek and Potato Soup Recipe that Ms. Jeannie just made comes from Newport House in County Mayo.

Newport House, County Mayo. Love all that ivy!

Built in the 1700’s, the country estate is now part of the Relais & Chateaux distinguished hotel group. It is a small, luxury country inn known most for its location overlooking the Newport River and its salmon and sea trout fishing, both in the river and in nearby waterways. The current owners, who were originally guests at the hotel, so fell in love with their accommodations  they bought the hotel in the mid-1980’s to ensure that they would always have a fishing retreat to “come home to.” Imagine that! Going on vacation and purchasing your vacation destination because you loved it that much! Ms. Jeannie can totally understand – Ireland is magical like that:)

Here are some interior photos. The owners have decorated the hotel in a variety of antiques including Regency style mirrors. It looks like it has a lot of character!

newport-house-hotel-04

newport-house-hotel-02-300x300


newport-house-hotel-03

The waterways surrounding the town of Newport. Photo courtesy of australliantraveller.net
The waterways surrounding the town of Newport. Photo courtesy of australiantraveller.net

It’s no wonder that soup is on the menu at Newport House. After a cool day of fishing on the water, Ms. Jeannie bets that a cup of hot potato soup is just what you’d want to have! She was delighted to see that it is still on the menu in the hotel’s dining room!

Ms. Jeannie's Leek and Potato Soup...
Ms. Jeannie’s Leek and Potato Soup…

Ms. Jeannie modified the recipe just a tad to incorporate items she already had on hand, which included a few bunches of fresh spinach tossed in at the very end.

Here’s the recipe, with Ms. Jeannie’s substitutions in parentheses…

Leek and Potato Soup – Serves 4

4 tablespoons butter (Ms. Jeannie used 2 tablespoons olive oil and 2 tablespoons butter)

1 1/4 lbs. leeks, cleaned and sliced

1 cup onion, chopped

3/4 cup celery, chopped

4 cups homemade chicken broth

8 to 10 oz. potatoes, peeled and chopped (Ms. Jeannie used 2 large russet baking potatoes)

1 spring fresh thyme, leaves pulled

1 fresh sage leaf, whole

Salt & pepper to taste

1/2 cup heavy whipping cream (Ms. Jeannie used 1/2 cup of 2% milk)

2 large handful bunches of fresh spinach

1. In a large saucepan melt butter (and oil, if using Ms. Jeannie’s version) over medium low heat. Add leeks, onion and celery and saute until onions are translucent but not browned (about 5-7 minutes).

2. Add the chicken broth, potatoes, thyme and sage. Simmer for 20 minutes until potatoes are tender.

3. Transfer to a blender and puree. Return soup to original cooking pot,  add cream (or milk) and salt and pepper. Fold in spinach and cook over low heat for 5 more minutes before serving.

Ms. Jeannie served her soup with a multi-grain baguette which was good for dipping! And, despite having only a 1/2 cup of cream (or milk in Ms. Jeannie’s case) this is an incredibly creamy soup once it is pureed. And it is quick to make with few ingredients! Thank you Ireland for making dinner simple and delicious!!!

Over the next couple of weeks, leading up to St. Patrick’s Day (Mr. Jeannie Ology’s heritage day!),  Ms. Jeannie will be trying the recipes in the cookbook from the hotels and country houses she and her dad stayed in on their vacation. These are sneak peeks of three of them…

The Park Hotel in Kenmare, County Kerry
The Park Hotel in Kenmare, County Kerry (Ms. Jeannie’s favorite!)

Dromoland Castle in County Clare

The Shelbourne Hotel on St. Stephens Green in Dublin

Until next time…Slainte, dear readers! Which means cheers in Irish:)